How to Make Your Own Hiking Stick
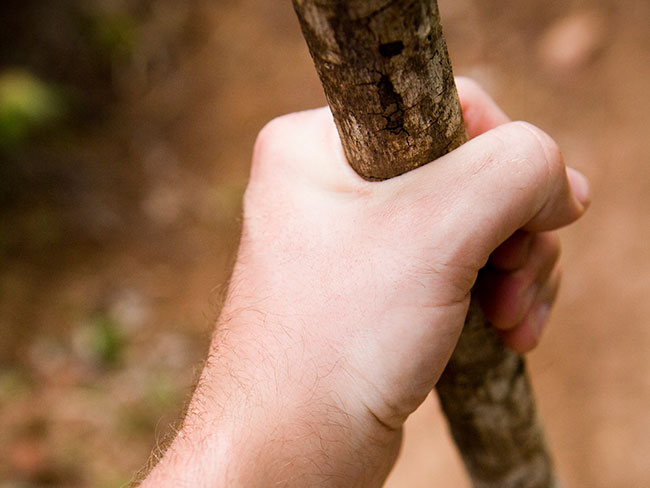
Walking sticks make hiking more fun. Also called hiking poles or hiking staffs, they let your arms get into the act, so you cover ground more easily. Even better, they help you keep your balance, which means that heavy pack will stay on your back instead of tumbling down some deep ravine — and maybe taking you with it! Here’s how to create your own walking stick or hiking pole.
WHAT YOU’LL NEED:
- A straight tree or tree branch that’s 1-1⁄2 to 2 inches thick at its big end, and 55 to 65 inches long (DO NOT CUT ANY TREE; see Step 1.)
- A 1-inch-long piece of 3⁄4-inch diameter copper water pipe
- Five-minute epoxy glue
- A small saw to trim the stick to its final length
- A sharp pocketknife
- A spokeshave and a wood-burning tool (both optional)
- Adult help and/or supervision
WHAT YOU’LL DO:
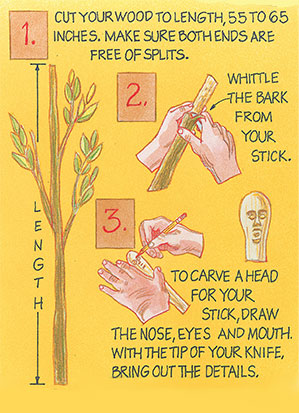 Step 1: Cut your wood to length, making sure both ends are free of splits.
You can use dead, dry wood, but it’s hard to carve and makes a weak walking stick. If possible, use fresh wood; hardwood from deciduous (leafy) trees is better than evergreen softwood because it is less gummy.
To choose the right size, stand with your arms at your side and the stick should be about 6 or 8 inches taller than your elbow. Pick an even longer stick if you’ll be tackling steep terrain. If you’re really just planning on walking with your stick, a shorter one will do.
Note: Scouts never cut just any live tree! Take wood only from approved sources, such as a conservation project that thins out a timber stand or trail-building and trail-improvement projects.
Step 2: Using your pocketknife, whittle the bark from your stick, revealing the bright wood beneath. This job takes patience, especially when you are working around knots. Keep at it. You may discover your stick has an inner layer of bark, as well. Carve it away too, or your stick will darken as it dries.
Step 3: Now is the time to carve a head for your stick, if you want one. Using a pencil, draw on the nose, eyes and mouth, then slowly and carefully use the tip of your knife to bring out the details. If you rush this part of your work, you risk slipping and cutting yourself.
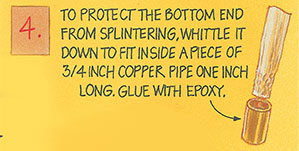 Step 4: To protect the bottom end of your walking stick from splintering, whittle it down until the piece of copper pipe slips snugly onto it. Secure the pipe permanently with five-minute epoxy.
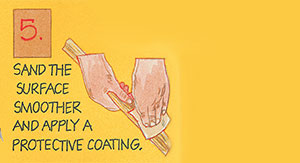 Step 5: Your walking stick is now ready for immediate use. However, if you’d like to carve it to a smoother finish and apply a protective coat, you’ll need to let it dry indoors for about a month. Use sandpaper or a spokeshave (if you have one) to make its surface even smoother.
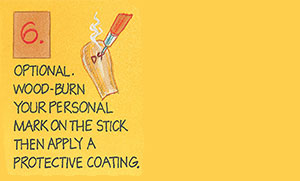 Step 6: Optional: Add your personal mark to the walking stick using a wood-burning tool. When you have the stick carved to your satisfaction, apply a stain or other such finish and a protective coat of polyurethane.
Take your walking stick with you on all your hikes. Whenever you pick it up, the stick will remind you of your past outdoor adventures and make you wonder what excitement lies ahead.
it is really good i think i might do loads and sell them it is a good way to make you would not think it would be that easy
🙂 🙂 🙂
I never had to do any of that other stuff, I just cut a small tree down with long hard branches. Hey, it worked for me!
It must be the feeling that celebities receive in a crowded room, everyones eyes following you across the room, complements of admiration are everywhere and then to say “I made it”. It’s my homemade staff, It was made with LOVE and each person, wishing they could own such a stick. Something happens when your fingers grasp a stick, it becomes a nature thing, gives comfort on the trail as far as the eye can see, and then take you home
a walkin stick give me confidence and a feeling of having security,if approached by a preditor. Its also wonderful for clearing the trail of spider webs and poking around in places you ought not be stickin your hands in. Its like a third hand on the trail
if you find a small sapling you can use the roots as decoration on top
Geocaching rocks!!!
I use to read about 15 blogs a day, but because my time is nowlimited, I only can read 1 or 2 now. And this is one of them…Great post!
Walking sticks are so much fun for the kids, in our troop each kid picked a color, eg yellow for sun, brown for earth, etc painted each color on each stick, plus the sign for each, when we finished everyone had a stick with all the colors, but their color was on top, kids loved doing this.of course dont forget add the feathers and beads, or whatever they want.
You may be able to chop down a small evasive tree (or, a tree that acts like a weed and eventually kills other trees), but it is probably better to use a branch that has already been cut.
I made mine 3 years ago. It is awesome! it was from a branch from my tree and
the tree is some type of tupelo tree and it is a awesome tree!
The handle is bent to the left and I made a leather slip cover to go over the handle.
sincerly, love guns
I made my own when I was at a Scout Camp. They really do come in handy! I carved my name and the date into it. Also, I put some other things. You can also use it not only on hikes, but many other places.
I made a couple of walking sticks using branches. I also have found that doing to a hardware store and buying dowels also work well as they are perfectly round and come in all types of wood. from there it’s up to your imagination as to what you want to put on it. I placed a small compas/ thermomiter on mine as well as used 550 cord (parachute cord) to make a hand grip. On another I tried my hand at ingraving. and staining the walking stick.
I LOVE THIS!!!!!
Whoop de doo! I get to make a hiking stick tonight. Thanks for providing this information! Peace out!
I like to use a round latching as a grip/handle. It keeps your hand from slipping and getting splinters, and it is a fairly simple knot. Also, I take the metal badges you could get at camps and nails them on. It makes a good souviner.
On my walkingstaff, I use a round lashing as a grip. Also, I use the medal thingys you can buy at camp, and nail them on. It makes a good souvineer. BTW, I named mine Nathan. ;^D
show how to make desigs and make it shorter!!!!!~
I made one a long time ago. I found a dying small tree that had a vine growing around and around and around it – it has a great natural curly appearance – I get lots of comments about it. After peeling the bark and sanding it I let it dry for several months and then applied a light wood stain and several coats of varnish. I also put a rubber tip on the end to keep the wood from wearing. I have had this for over 30 years now and it still serves me well.
I burn my name with a magnifying glass, since I can’t use a burning tool.
ha this is really good
yesterday i made my own walkin stick it was fantastic!
A walking stick can serve as a great memento of a Scouting adventure, especially if it is made of a wood native to the area visited. A natural hiking stick can also be used to teach new Scouts about respecting the outdoors – since no Scout or Cub Scout would ever cut a live tree for a walking staff. That would go against the Outdoor Code and the Leave No Trace Guidelines. One of the best comments I heard from my Pack this past summer was: “these hiking sticks are great, and even better, they were FREE!”
Another way to attach a strap is to use a Klemheist knot (Google it). This has the advantage of being adjustable and removable. It also keeps you from having to drill, nail, staple or otherwise damaging your stick. Yes, it even works with webbing.
If you drill a small hole just above the “handle”, on your stick, then pull a peice of thong or cord (doubled up of course), with a piece of wire, through the hole; then tie a large knot on the loose end, then put some Elmers glue in the hole and pull the knot partway through so that the glue and thong set in place, you should have no problems putting a strap or handle on your stick. Walking sticks are part of the Woodcarving Merit Badge course that we teach at our Council summer camp each year, this trick works for us.
A great place to find sticks for walking sticks is beaver huts/dams. Be careful when walking around them. You can also find sticks pushed up on shore around the huts. The beavers already strip the bark off and you can find some really great starter walking sticks!
use a coping saw to take off the branches and then sand then.
My cub scout troop made walking sticks and they loved them, we used turkey and duck feathers from a local farm. we also carved arrow heads and used leather and laced woden beads. my troop loved this and we plan on doing one each year for our new comers.
Anybody have any ideas about the best way to attach a wrist strap to the stick. I was thinking about just screwing a loop of webbing to it but would be intersted in any better ideas.
I haven’t made one of these myself, but my mom’s friend gave me one that I could carve on at our school craft fair. This project looks really fun and I can’t wait to d it myself. There are plenty of trees in my backyard, so I think it’s going to be pretty easy to get a tree branch. Also, I might consider wood-burning my walking stick, because I have already done that with my dad. Awesome idea! 🙂 😉
I go tenting with my family all the time and my walking sticks are just kinda picked up on the way and end up being fire wood on askadent
I made a walking stick before, but I never thought of using copper to protect it from splitting.
It looks really cool I am going to try it! Hey you may never know when you will need it on a hiking trip?
yeah i need this in troop
That was really helpful, thanks for doing that!
We did these with our troop at Scout Camp last summer. They are totally awesome for Scoutmasters. Kids are busy! Kids are Quiet! Kids are using their knives for a worthwhile project! Who could ask for anything more!
Rudi, Either somebody will come and teach you about it, as in for my Troop there was a little Session of using the hatchet. And when we went to Summer Camp they had it where they were teaching the whole Totin’ Chit, same as Fireman Chit. If nobody comes from your Troop tell your Scoutmaster, maybe he can resolve it, maybe a new volunteer to teach yall that.
Our Scoutmaster brought a bunch of dried walking sticks to Summer Camp. After we earned our Totin’ Chit, we got to carve on them. It was fun.
sweet!!!!!!
dude i want to get my totin chip but ill probaly do it at home does anyone no how to get it (everyone says some guy will do it but he never comes to meetings
(: sweet.
can u say how to carve a birds head too?:-)
🙂 🙂 🙂 awesome idea. neat.
Please keep on showing these projects. I love them! 🙂
you could attach an arrowhead to it and make a spear.
geocaching is when people have boxes that they hide with stuff in them like a notebook, toy cars, and little stuff like that.they get the coordinates on a GPS and put them on a website and you get your own GPS, punch in the coordinates, and go find it. it’s like a high-tech game of hide and go seek.
Yo-shi, what is geocaching?
That’s a cool project!
Geocaching rules Yo-shi!!!
Dude I can’t wait until I get a totin’ chip now!
Hmmm….would be great for geocaching, with a Signal head on the top. Thanks BL!