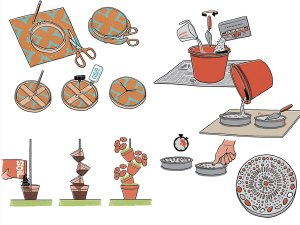
this is realy great, i am making one of these right away thanks ever so much
I have a wolf one,but I might make a dirt bike rider one.
what if you dont want to waste your action toy,would you have to buy a new one????? but still an OK project
You don’t have to use an action figure. You could always make the acrobat out things you have around the house; corks, wood, cardboard, etc. Look around and see what you have then get creative.
easy but fun.for it to do flips move the stick forward and backward.
I thought it was the biggest wast of my time it doesnt even do anything.
This is one of the funnest projects I’ve ever done! I love making the little action figures and playing with them. You can get the hang of how to make them flip pretty easily and the work itself isn’t all that bad. I like to use little spiderman actions figures or some of the GI Joe guys from my dad’s collection. (You usually can’t get those at stores any more.) Great project idea! 2 thumbs up!! (Would be 10 if I had more thumbs!)
the coolest project I have ever done!!!!!!!!!!!!!!!!!!!!!!
dumb,stupid but yet………….cool!!!!!!!!!!!!!!!!!!!!!!!!!!!!!!!!!!!!!!!!!!!!!!!!!!!!!!!!!!!!!!!!!!!!!!!!!!!!!!!!?
It is wasteful to put holes in an a action figure.
You can turn an old action figure toy into a neat new acrobat that can do flips and somersaults.
Ac tually it is quite workable.
In one case something like this was shown to reffuges in a camp in Africa. One tribal group that seemed impervious to new ideas tried it and soon started taking courses in other subjects.
Do a GOOGLE search on Solar Cookers, Solar Stoves, ect.
Another good source “Fun With the Sun” by D. S. Hallacy.
Simple cookers can be made from three reflector panels (like two walls and a floor), a dark colored glass jar with lid (to hold the food) and a plastic roasting bag. The three panels form a two walls, corner and floor structure. Put the food in the jar and add water to cover and close the jar. Put the jar in the bag. Put the bag in the reflector corner. Inflate the bag slightly and tie it shut. The bag helps to trap hot air around the jar.
I have heard a rumor that if you lay a closed one liter pop bottle half full of water in the sun for six hours the water will get hot enough to kill microorganisms. I would advise against testing this method but try to see how hot the water can get as a Science Fair project.
This is a neat thing! Great for when you can’t get a fire started!
i can melt a candy bar in my pocket, what if i want a hamburger, or cook up some road kill? bogus.
I’m gonna get food poison and suit the magasine. The real American Way!
I think it is a great idea and it sounds lightweight.
I thought it was great!! By the way, I don’t want to sound rude or anything, but for those who asked “how does it get the heat?” the answer is the following: Light energy in the form of photons hits the black construction paper. The black construction paper absorbs the light energy, turning it into heat. The aluminum is apparently for centering more light onto the paper, therefore creating more heat.
i wish we did this in Girl Scout camp, but we only did the “Dutch Oven.”
can you make briscuits,pizza,steak,fish,hambergers and other stuff??
write back
its a great idea accept if the wind blows can you cook steak??
I have’it done it but it sounds cool!!!!!!!!!!!!!!!!!!!!!!!!!!!!!!!!!!!!!!!!!!!!!!!!!!!!!!!!!!!!!!!
What a way to cook without using the stove, this is really cool or hot depending on how you look at it.
i want to tri it!!! this is my 1st time onthe website i love most(after 5 minutes)!!!;)
it’s not actrually solar powered. it’s powered by heat energy
sorry about sounding so mean but i watch the science channel for fun
There is also a way to make biscuits like this. Take a regular box and cover all sides with aluminum foil and tape it in. Take old wire coat hangers and punch them through, about three of the long ends to hold a pie plate. You fill another pie plate with coals from your fire and put the biscuits on the other pie plate above the coals, resting on the coat hangers. close the box and let them cook. They are great. You must make sure the whole inside of the box is coated in foil or else it will burn through. This happened the first time my patrol and I tried it, but the biscuits were still great. We laugh about it all the time now!
Hey, Tumten the black paper absorbs the heat with reflection of the aluminum foil. It also sounds really COOOOOOOOOL.
Awsome! I have tried many things like this but, this is the best i have ever seen! It is truly wonderful and is useful and a cheap way to cook. MY RATING: 5 stars
i have’nt used it yet but i can’t wat {;its cool;maybe;}
I’ve got a camping trip to go to, so this [i]might[/i] be of use!
This is sweet, when I get home I am doing this I hope to here more cool stuff like this. I’v been reading the magizene for 6 years and I just now got to the website
I started my marshmallow on fire! That thing is hot! (pun intended)
You don’t need four burners and a gas line to make some great-tasting trail food.
it looks really cool to me by the way i think it is cool making are own Dino Swamps
sounds cool but kind of expensive considering you have to buy a pump unless you all reddy have one your not using
I’m not that interested in dinosaurs, but my friend is and we made this together so I can answer some questions about it!
-You need an adult to help you or you probably will have no idea how to do many of the steps!
-Most of the suplies can be found at places like Home Depot® or hardware stores in your area. The plastic dinosaurs are cheep and easy to find at Toys ‘R’ Us®, Wal*Mart®, and Target®.
-It takes a couple hours to make, but even for a person who doesn’t like dinosaurs all that much, (like me,) it’s hours of fun, not boring work.
-The work is a little complicated and so are the diagrams, but it isn’t any harder then a complicated lego project! Hope I could help!
If you could tell me where I could find all of the pieces I would want to build it!!!!!!
I’m gonna make this tomorrow, and a bunch of other dioramas, but i’m gonna spraypaint the fake plants, and make it really wild.
if you make it a little more simple people will like it.but its a good project
Create a cool prehistoric scene for your dinosaur toys using items you may already have at home.
nice arrow but u need like months the grind the arrow head to goos shape with hands
bowman13 the correct way tomake the notches is to simply use a nail filer this will create a simple but yet affective arrow.
if you live in ohio simply go down to flint ridge.there is tons and tons of flint there but if u find a flint arrow head keep it dont put it on the arrow oh and this really helped me out thanks!
i use deer antlers for my arrow heads…i have way to many antlers hangin and i cant find any good sharp rock so i though of the antlers…they work if the antlers are fresh or they lose the wieght from age…
thx…. this info will help me to create an arrow for my NAS 200 class
this is a good usefull way to use up boring hours u spend on playing computor games and watching tv, i like being creative and this is a good fun way to waste boring t.v time.
This is a good experiment but it is hard to make the cut in the back so that the bow string can hold it.
where do you get the flint for the arrowhead tips? ive looked everywhere! could you possibly make the arrowhead out of something else, like stone or even hardwood??
i make arrows alot and this guide was very helpful. instead of using real glue though , my grandfather showed me the way to make hide glue which we used to use. i have also made various bows of ; osage orange , hickory , and oak (all sinew backed which makes it stronger)
The natives used animal sinew to bind the feathers to the arrows
Thank you. This is very useful information and the directions are straight forward & easily understood. Although I will have to adapt for time & age constraints for my Wolf Scouts; I intend to use this tonight for a den meeting. Wolf Den Leader.
ok glue can work but what about somthing different, how did the native’s do it they well i dont think they had glue did they?
this is really cool but have you tryed to make a bow before
This is a great project that I really enjoy doing beacuse Native Americans interst me. It’s not that hard and a great way to spend an afternoon on a weekend or in the summer that really beats playing video games inside! I didn’t have any problems with it and am going to try it again with my scout troop later this summer. Thanks!
This is an awesome way to make arrows and I like to do Native American projects, so this one was perfect for me. It’s not that hard and a great way to spend an afternoon on a weekend or in the summer. My only problem with this was that it is really hard to find arrowheads, so I had to use one from my dad’s collection. Are there any fake arrowheads you can buy because my dad has said if I want to do this project again, I can’t use one of his because his collection is really important to him! Suggestions please!!
you are not chewing the intestine, you are chewing the tendons, which is pretty much just like chewing really tough meat
This was a lot funner than buying an arrow at the store. Thanks you very much.
This is a really good way to make arrows… it really worked 4 me!
i made the tip flint and i shot it a steel plate and sparks flew everywhere!
i made mine flint and i shot it at a steel plate and sparks shot everywhere
This arrow is like the one the mighty native Americans used.I love it!
it was cool i thought u would use a stick but it was fun
realarrows are better but if youre lost these are good . ARHCERY RULES !!!!!!!!!! !!!!!!!!!!!!!!!!!!!!!!!!!!!!!!!!!!!!!!!!!!!!!!!!!!!!!!!!!!!!!!!!!!!!!!!!!!!!!!!!!!!!!!!!!!!!!!!!!!!!!!!!!!!!!!!!!!!!!!!!!!!!!!!
making the arrow tip was fun!!!!!!!!!!!!!!!!!!!!!!!!!!!!!!!!!!!!!!!!!!!!!!!!!!!!!!!!!!!!!!!!!!!!!!!!!!!!!!!!
i think flint would work for the arrowhead because it’s nice and sharp
I make arrows the way my Iroquois ancestors did long ago. You can, too.
In our modern world, the hard part is getting authentic materials, but you can use some alternatives that I’ve suggested.
i still can’t figure out how to put the water in so it will sink.
i really like golf and i itch on my neck because it makes me happy.
This thing was awsome and me and my brother play it every day since we were 3 and now we are 72
Way neato! My friend Calvin and I are going to try using old tomato cages for obstacles to hit our balls through.
im going to try tunnel in the sky!!!!!it looks cool and fun!!!!!!!!!!!!!!!!!!!!!!!!!!!!!!!!!!!!!!!!!!!!
That is a coolllllllllllllllllllllllll idea. Lets hope my dad wont get mad at me! Try a stick for a club and a ball or cylinder for the ball!
i’m building a minigolf for math. i didn’t thik it would be fun but i was wrong
i like this site……….but yet i like everything and one!!!!!!!!!!!!!!!!!
instead of using a croquet pinn U can dig a hole and put a cup in it
they should make a computer game where you make your own golf coures and you play it in glasses (uploed the cources in the glasses get a plastic stick and imagin it’s a golf stick thing)
really neat!!-i have afterschool care with boys ages 8-14 anf they loved this project and then i have daycare boys ages 3 and they loved this with the croquet mallets and balls–it’s up still 2weeks later and the hit of the neighborhood-=thanks for a wonderful project!!!!!!!!!!!!!!!!!!!!!!!!!!~l
I wanted to build my own coarse before i saw this. I will try to make a hole in june. when it is done, does anyone want to come over and play?
I did it and it’s fun. I didn’t do the designs as it says,but they are all easy-to-make and fun.
cooooooooooooooollllllllllllllllllllllllllllllllllllllllll…………….
I think this build your own mini golf course is going to be great.
With this simple project, you’ll be outside playing miniature golf in no time. You can build your course with any available combination of bricks, wood, aluminum siding, whatever works.
They look so cool to make but since its winter I probably won’t be able to use them in the house:)
it’s great i can’t belive that you can make that mabye you can enter the circus
I think that I can use that idea about the xtra holes and wing nuts. if u don’t wanna pull up at the tops then u can duc tape your feet to the footholds. only do this if your a pro at these things. xtremly difficult to get off.
My dad and brother threw some stilts together without directions and I’m surprised how much they resemble these!
iv used 12 ft b4. epical stilts. just get good @ it ._.
Drill a few extra holes in the stilts and use winged nuts to tighten down the foot rests. This way you skip the finishing nails, the glueing, the height of the stilts becomes adjustable.
I love stilts they cost about $40.00 and this is a lot cheaper and I think it’s great
I am making some right now, but not this design. All I need is the
bolts and it is done.
I made some stilts about thirty-six inches high!! There great!!! I can lean against the gutters of our house!!!
thats really sweet and cool Im totally going to try it!!!!!
Did they need to tell you that? how hard is it to make a pair of stilts?
Why round the bottom of the stilts? That would just make them more susceptable to falling over.
This is just so cool man. Make me one too. I love stilts. It’s hard to use them I know but i want to try.
There is something i cant do.i make the stilts, then i cant balance on them. u should put feet on the bottom
Thats pretty sweet i’m gonna try it!!!!!!!!!!!!!!!!!!!!!!!!!!!!
Stand taller with stilts. After an afternoon’s work, you’ll be able to walk around at least 12 inches taller than you are now. That’s a pretty fast growth spurt!
I bought an old backpack from the goodwill store, removed the belt, and then used it as part of the harness.
I found that if you crossed the poles to your sled before you tied it to your waist the sled was more stable and would track behind you better.
I like it but could you try to make the sled a lot lighter in weight
Sounds awsome gu’na build it , I need my dad to take me to the hardware store
That’s a good idea for cross-country skiing. I’m going to try it for a campout in a few weeks.
i would make one of these but i live in florida and we dont get any snow so i will biuld one one wheels
Otter, if there was no snow then you would not use it!
hey marine! this would not work for me, I live in hot places d00d!
Well, Collector of chickens, the mountains are usually rocky and very steep!
Question……Why wouldn’t it work in the mountains?..There is
plenty of snow way up there!
Great idea, but probably doesn’t work in the mountains where its most needed!
Hey I like this idea I think it would work best in the snow thiugh.
Use this homemade sled to handle the extra weight of winter camping gear.
um i dont think it works it dosnt have the rite tecnolagy but i will try it becaes it looks cool
COOL PUT A VIDEO OF THE DIRECTIONS AND A VIDEO OF IT WORKING THANKS
I love sience in fact I maybe a sientist when I grow up.
My class once made a microscope but it was slightly different.
I have a real microscope at home.It sees cells,but not much though.
It probibly dos’nt see cells just small detals.
You can just take a microscope slide and put a drop of tap water on it.
this will be cool it will probly be expensive for distilled water though
it’s not that expensive its not even but 3 or 4 dollars for
a gallon at walmart
Cool scope!!!!!!!!!!!!!!!!!!!!!!!!!!!!!!!!!!!!!!!!!!!!!!!!!!!!!
Create a tool straight out of history.
Do you need a clear bottle, or could I use a green one from like 7UP?
I had my kids do this at our last den meeting, and my son’s seeds are sprouting beautifully! We couldn’t punch holes in the lids, so we just loosened them, and it seems to be working nicely. We used Juicy Juice bottles. So, we’re reusing materials while earning our World Conservation Badges! This was a great, simple project that we can do over and over again.
this is the best project and my mom isnt screaming at me this time thank you
Awesome IM DOING A SCIENCE PROJECT AND THIS IS PERFECT! THANK YOU
i am trying it right it right now. i think it will work good
Gengen
beleive it or not but that is not sweat it is a raincloud. This makes a tiny ecosystem I learned that in biology A
im gunna try it on saturday and if it works ill grow trees and everything with it!
Sounds cool and i believe it. I have tried tried something similar to this and it worked very well.
Sounds cool and i believe it. I have tried something similar to this and it worked very well.
do not believe a word of it ….. what kind of seed? I want a tree seed??
You don’t have to wait for the right season to plant your flower and vegetable seeds. Grow plants indoors any time of year with this easy project.
when you get your box done how do you get the bats to come to your box thankyou
MY MOM HATES BATS SO I’M NOT ALLOWED TO BUILD ONE. WHAT DO I DO?
the next time she gets a mosquito bite, or squeals about a flying bug she sees, tell her that one little bat can eat up to 1200 mosquitoes in an hour- and they also eat all kinds of other bugs! A bat house in your yard will keep the whole area mosquito and bug free- try that!
To batman, you should use plywood.
S.(sucsess) T. (tip) Stain the boards with black stain before asembly.
Me and my dad built a huge one with 4 layers!! We call it “Bat Condo.”
hi i built a bathouse using some old boards off my barn.i simply staggered three planks about 1/2 apart giving me 6 slats for the bats.after 2 weeks i checked inside and there had to be at least 20 bats in there!!cost to construct…………zero!!
Great instructions…maybe a photo of the completed project!
its way more easy to glue some wooden skewers to the backboard than to try to roughen it up or attach plastic [that could potentially catch and choke a bat]. works just as well, even easyer for the bats to grab onto.
Cool site. I thought you might like to have add a link about bat house plans for even bigger houses since those tend to work better. My site just happens to provide suck plans. Here’s the info:
Scott’s Bat House Plan Page
http://habitat.ms11.net/bat/bathome.htm
Good Luck,
Scott
–
Scott’s Backyard Habitat Enhancement
like to see other bat houses with instructions like three chambered
Use these plans to create a mini-habitat for some of North America's most misunderstood—yet valuable—creatures.
..I am sooo psyched!! I love to fish and camp; and always need worms. So this is such a cool idea, as well as profitable. Now all I need is someone to get my fish off the hook!!Ha! Ha!
I had three worm beds, open ground with frames, all flooded. I have to try to think this over and decide what will be better. Perhaps the concrete around the frame with no breaks will stop the water rush from Texas storms.
Candin
built mine using a large black container that was used for cow protien. I drilled a hole in the bottom and covered it with screeen. It is hot here in Texas so I pour a pitcher of cold water on them every other day. They seem to be doing ok!
First for poor ol Sparky..Most worms hang at @ 18″ deepths well within the authors 36″. like the gardners I’m in it for da poop. What I grow loves it and needs the natural “pest controll” Best organic I can raise for my self. Any overage of worms don’t have too escape I give them their freedom willingly, in my yard and flower beds. Go green baby!
My family has a worm bed we use the worms for fishing and composting.
I dug a worm bed & used tin sheets for the side, do you think that it would be ok to use the tin for the bottom to or not nessasery The hole is about 6 foot wideby 6 foot long by about 2 & a half foot deep,& also does it matter what type of dirt you use
definatly going to try,i live near lakes and people need worms as bait
try feeding your worms a mixture of protein powder that you get at any health food store and whole grain wheat bread. it makes your worms BIG AND STRONG!!!
There are many boxes, this one really works. It has provided enough worms for the season and has been profitable. Thanks for the cool idea. The best thing is the profit makes it’s self. Word of mouth and just being at your local lakes at the right time of the day. Most people run out of worms around noon or 2pm. All I do is have plenty of worms to go around.
We have a much smaller version, I caulked a screen onto the bottom of a larger planter with pre-drilled holes. Filled it with a mixture of soil and peat moss to a little more than half full, then added both nite crawlers and red worms that I found while gardening. I place the planter inside a window well on the northeast side of the house which is very shady. I occasionally water & feed them small amounts of egg shells, coffee grounds, shredded paper, dried plants/leaves, whatever natural scraps I have. No cover on it. They multiply quickly and we always have our fishing bait. We release them (if there are any left) late fall as they would freeze in our Wisconsin winters.
Built 2 last year, Did wonderful, now I have 8 more making 10. Worms are 3.50 a box at the store, I get 2.00 a box and can’t keep up. Thanks a million……
I have found that as long as the worms are happy they stay, even without a bottom. Even so, I added a wire and screen bottom to mine.
Once again, Thank you………
)
this sounds like a great idea but i think waater will collect at the bottom!!!!
i think that you r right and that the worms will bring lots of money!!!
You could drill a hole in the bottom of it to let the water drain so they don’t drowned.
I’m a Master Gardender and working with 2 other MG’s helping some elementary students become gardeners in their own school yard. To create more interest, I’m going to feed this information to them so they can also build themselves a worm bed. They’ll love this! Thank you!
I think this is a wonderful idea, because sometimes I can’t aford bait AND gas money…lol
i am so gonna do this im gonna do this weekend cause one time i went to go buy worms from the dixie dairy bar there is sopposed to be 30 worms in there and there was only 5 worms in there i bought them with 50$—{} i got ripped off? didnt i.
The worm bed works well under a grape arbor or wisteria bush. They like the coolness and the air flows freely. Watch for snakes when you feed the worms and dig worms to sell. They like to lie beside the worm bed.
I know I spelled that wrong
I have a few questions…
How can the worms crawl out? The sides are straight up and down arn’t they?
When it rains… won’t the water just collect in there and drown the worms?
If you know the answers to either of these PLEASE let me know.
Thanks!
This is great! I live near a lake and EVERYONE has a boat and goes fishing! Yes! This is JUST the kind of thing I need! Thank you!
next spring i will start collecting red worms the in the summer I will sell them
I’m fishing now and I’m tired of buying worms and then they die. I’m going to do this right now!
I think that i might want to do this over the summer using some stuff that my parents aren’t using. I might be able to sell at least ten worms to my dad.
has anyone every “called” worms?….take a stick (3 foot or so ) and carve notches about every 8″…place pointed end of “grunt stick” into ground, then begin furiously rubbing/clicking the notches with another stick,,,after 5-10 minutes go out 5-10 yds from where you are “grunting” and they should be up trying to wiggle away…they think it’s an armadillo or such from the vibrations, you may have to practice “grunting” for a while 1st, but this does work and if you’re outta bait at the lake etc. this beats running to the bait house
your little thing about worm beds SUCK what keeps them from digging through the bottom of the hole
the worms will hang around…you are feeding them, why would they leave??
An easier and cheaper version can be made by purchasing a rubber tote box about 1.5 x 3 feet. They run 3-7 dollars at any Target, Walmart, etc. With adult supervision use a sharp utility knife to cut 4 holes in both the bottom and lid about 1.5-2 inches in diameter glue with hot glue gun a square of screen mesh over the holes. The bottom holes allow for moisture to drain as green waist breaks down. The holes in the lid will allow for air flow and ventelation. You may need more vent holes and may even cut some in the sides of the bucket above the bedding line. Fill the tote half full of bedding and add worms. Add scraps to just on side and as the worms break them down level out the bedding. As the tote feels with casings (worm poop) and fills to about 3/4 full you will need to emptly worms and casings. Count out enough worms to restart a new bed. You can add new peat moss, some of the casings from the previous batch and a small amount of soil. Refill the tote to half of just under half full and start over. You can sell the extra worms to bait shops, and farmers will be happy to purchase the extra casings for the flower beds and gardens. One tip for helping drainage a few old bricks on the corners and in the middle to raise the bottom off the floor is best, the worms need to be a cool place so if you live in a hot area (we live in Arizona) moving the totes into the garage or under a covered cool porch is great. Also if you live in a cold climate, they will bury down in freezing weather but production slows greatly, so moving it to a warmer area such as the garage in the winter is good for these areas as well. In cold areas have extra totes ready so that you can thin out the worms in the first and build a stock pile of worms and casings to meet demand of spring when fisherman and gardners start their summer activity.
Have you ever wished you could dig money out of the ground? In a way you can. Raising worms in a small worm farm can make you extra money during the summer.
Getting a hammock isn’t as fun s sitting in something that you made
dude this was awesome i am going to go sleep in mine
now we know how to recycle those out door chair seats when the cheap frames fall apart!! another use for a light but strong! bamboo poles!
I’ve been making a camp chair for my troop at every summer camp for the last three years, but mine doesn’t use a tarp my troop weaves an actual chair out of rope and then we add a foot rest and it’s the most amazing chair ever. My troop won second place at a pioneering weekend with my chair a few years back.
I use this same idea to build a water filter system. I tie 3 levels on the tripod. The topmost of burlap to filter leaves, sticks etc, the second level of fine cotton to filter dirt, the lower level of very fine cotton covered with charcoal to remove everything else. I have a bucket underneath the lowest level to catch the clean water. I still boil it afterwards but the tripod water filter removes alot of the impurities. Pour the water into the top layer and let it leach down through the layers. When the clothes become clogged, clean them or replace them.
James, hey do you have more details on the cloth and charcoal on the water purifire gadget. always looking for new ideas for camp.
That looks totallly cool. It also looks cozy. I should make one because all the other Scouts and my friends keep on Olying their chairs! It looks easy, but can you use it in the winter and any other season or just one!???
i dont know whether to use this i need an idea this is the only 1 but that guy says it doesnt work
Takes a bit of trial and error to get the tarp at the right level and is all according to personal preference and comfort-level.
Our Cub scouts built three of these in about two hours. We gathered the poles a few days in advance and stripped the bark off. With a Boy’s Life Magazine close by, we followed the easy directions and were proud of our accomplishments when all three worked well. We even discussed how to change the design to make a hammock to sleep in. Thanks Boy’s Life, this was one of our best meetings.
I tried this and by using the end of a long rope to tie the tarp to the spar and tying the ropes to the spars at the same level the chair was better than a hammock and can be easily madde on a camping trip.
this looks comftorbal but complicated to build is there a simpler way of doing so
O.K. ya’ll I tried it(because it stopped raining) it works great!
Wow, that’s a most instructive video on how to perform a tripod lashing! A second video on how to prepare the tarp and to tie it to the spars is not shown. However, it is clear enough for me to do it with the assistance of the written instructions. In the flagpole video I learned to tie the taut-line hitch to the main line. In this video I learned that the hitch can also be used to tie a rope to a spar. The grip is good enough to hold the tarp without sliding down. I am just wondering whether Hurt Bottom had tied the taut-line hitch correctly to the spars. By the way, thank you again for the instructive video.
I tried making this at the last two campouts.
It didn’t work.
The tripod is fine, but when I attach the tarp, it slids to the bottom.
It still hurts.
Now this is preety cool im going to bulid this next trip.
me too you should probably write the directions down though so you know how:)
It’s raining outside, but when it stops, i’m trying this!!!
this is really cool im going to try it at the spring camporee
i made this at my camp and everybody wanted to sit in it. it was really comfortable and it counted as my first class camp gadget.boys life rules!
We are going to try to build this gadget on Saturday, any additional hints?
I am going to see if my troop wants to do this at summer camp for one of the pioneering projects because it looks cool and comfortable.
Too bad it’s still winter. I’m gonna make this in front of the lake or the river and read with the relaxing birds, water. I’m gonna have one great summer.
What are you going to do about the mistakes? For example, the ending knot in the vidio is not a clove hitch.
this sounds awesome im gonna try it at summer camp =)
this is cool cuz im a roap dude and this a cool thing to do for a meeting
Relax around camp by building a comfortable chair. It's easy if you have the pioneering skills.
Nice table.
Why are the adults building this? Where the BOY Scouts?
This is really cool! I can’t wait to use it on my next campout.
lashings are completeley IMPROPER!!! but if you do it right it will save you the expense of buying and or bringing a camp table.
In spite of any negative comments, if this method is sound then by all means use it. Many Thanks
The lashings shown ar not properly tied. In the sqoare lashing the clove hitchis not secured and the rope is not kept parralel. I the table top the lashing is not even close to the proper way!
I love the whole idea! Except my scout master tought us about the whole leave no trace thing does this leave any marks on the tree. And do you have to use any specail knots like the bowline or square knots?
well if you dont tie it too tight it wont ant the only other knot you really need to use is the clove hitch.
This video really gave me some ideas for our meeting next monday. We are having a competition to see who can create the best camp gadgets and I wanted to make a table. So THANKS!!!!
This camp table and all of the other pioneering projects for this webpage are great ideas for things to do around camp and for getting requirements for first class.
yeah and keep workin towards eagle dont stop! my bro is eagle and i almost gave up but i perservered and made star and almost life!
dear peeps doing this video i once saw in an old issue of bl (or the manual) a rope bride where instead of planks of wood hey had a bundle of sticks and i really wan o make i in my back yard bu i canon get my hands on the instructions plz help or somebody reply whit a link or something becuase really waned to do it today but alas i failed
This really seems like a cool thing to do. I can’t wait to try this on my next campout!!!:)
THis will really help me and other scouts with my woodman’s for fire crafter. and my troop can earn some extra points on camp inspections
Over time I’ve learned the universality of the clove hitch. To answer my previous comment (6-Robin), the square lashing begins and ends with clove hitches. So does the floor lashing. It begins and ends with clove hitches too.
If a picture speaks a thousand words, a video speaks a billion more. However, this video series is less instructive than the flagpole where each step is completely illustrated. For example, in Step One we begin with a clove hitch and proceed with a square lash to attach the spar to the tree but the video does not show how to end the square lash. Also, the other video does not show how to start and end the floor lashing. Regardless, we do learn and have some ideas to build a camp table through the videos. For that we thank Aaron Derr, Kevin Liles, and the Boys’ Life magazine for educating us.
this is awsome i alwase need a good table on camp outs
Im going to recomend this to the socuts that are working on First class, this seems really cool.
This will really help me get my first class rank. thanks
This (second) video is less confusing than the description in the Handbook, I think.
Keep your stuff out of the dirt by building a table for your camp. It's easy if you have the pioneering skills.
You can use a prussic to tie a pulley or biner to the top and run a line through it, you can raise and lower the flag instead of using the square or reef knots to attach the flag in one position.
“that’s great because I’m a new scout and I might use it on upcoming camping trips thanks new backpacker.”
This works fine, and it’s nice to see it in video. For my kids, all Cub Scouts, those stablizing ropes are deadly. We solved that by using a very short flagpole. It doesn’t go up 10 feet, and it’s dug into the ground and tamped down. And the flag is small. Everything’s undersized, but it keeps wind issues to a minimum and allows my scouts to do our pack ceremonies. Also, we put metal eyelets on the top and bottom of the pole so the rope can raise and lower the flag. We dig it back up again when we leave and place the grass, etc. back in the “hole,” and take apart our pole for the next trip, using it until the poles (cut sweetgum) rot.
What flag is permitted to fly higher than the United States Flag on a flag pole? When four flags are flying, how are they displayed on a flag pole–United States Flag, State Flag, County Flag and Chaplain’s Flag? How is the United States Flag displayed at the United Nations Conference Center which is located on United States soil like in New York City, New York?
Only one “flag” is aloud to fly above the US Flag. That is the chaplin’s pennet during religious services onboard US Navy ships. Flags of other sovreign nations fly at the same height. Check in the Webelos Handbook under the Citizens Activity Badge for other ways to properly display “Old Glory” and check with your local VFW Post they publish a great pamphlet on flag etiquet
It works in wind up to 18.63 mph. Any breeze above that, and you’re out of luck.
I agree with SPL, does it work in the wind or will it fall over?
Great video thank you so much….learn it and teach it to your scouts before going out and camping….practice, practice, practice!
Very clear video lesson.
As with any instruction it’s best for the Scouts to draw/write their own reminders then go into immeadiate practice. Someone once said we learn by doing.
I like it but where do you get the spars?!?!?!?!?!?!?!?!?!?!??!?!??!?!??!?!?!?!?!?
We lash a big carabiner to the top of the pole (pipe lashing works great) then run a loop of rope through the ‘biner. Then you can tie two simple knots in that rope to attach the flag with carabiners, so you can easily raise and lower the flag each day. Lashing an extra biner at the bottom makes it easy to tie off the extra rope, but we find it’s not necessary and so often skip doing this.
The videos are great but all of you have good ideas(diagrams are good, videos are good)
The videos are brilliant!!! I agree with Scout Mom, for those of us who have a hard time deciphering the diagrams the videos are time saving and easy to understand medium of instruction. Simply awesome!!! Diagrams do help of course for memory aids after learning through the videos. But, given the choice of videos and diagrams, I would definitely prefer the videos. Learn the knots and techniques at home or at school thoroughly – put them into memory. In the field, it is operation time. It is time to put what one learns into practice without the hustle and bustle of carrying diagrams around and referring to them. Thank you Aaron Derr and the videos producer for this most instructive means of disseminating knowledge.
I think the videos are great! For those of us who have a hard time deciphering the diagrams the videos help further explain how to do the knots. I do agree, though, that pictures and diagrams would be a help while on a trip.
common sense test-yes videos are terrific for instructions however not so transportble to camp with no electricity-diagrams would have been much more useful and practical
Show your colors by building a flagpole for your camp. It's easy if you have the pioneering skills.
Love the pinewood derby? Want tips for making your pinewood derby car go faster? Looking for ideas for an amazing pinewood derby design?
cool my mom has 3
I build bird house and feeders all the time and i sell a lot of them and its a fun thing to do for a hobby
Simple diagrams. I don’t get what you guys are mumbling about. Just pay attention to each detail and the diagrams are easy to read.
One problem is squirrels. When there are birds, there are squirrels. I would recommend waxing the pole or something so they can’t get up. When I was a little kid, I made a bird feeder in cub scouts, but the only thing that ate from there were squirrels. =/
Could you put in a picture of the final bird feeder?
suggest making the platform out of screening so that seeds will have a better chance of drying if they get wet
that will be the easy thing, but making a dollhouse for the birds will be the hard thing!
it would be great if there was a picture of the finished product so we can see what it should look like
Show the final picture for the feeder.
I Can’t Wait To Build It. I Have A Bird House, I’m Going To Put It Thare.
Tweeeeeeeeeeeeeeeeeeeeeeeeeeeeeeeeeeeeeeeeeet
This is very easy and I have done it a couple times, I don’t even need adult help.
However, like other people said, the diagrams are confusing. I just don’t look at them and follow the directions, but now that I’m used to making bird houses, it’s not really hard. I would just go ahead and try it if this is your first time doing a birdhouse. If you’re anything like me, you’ll find that it’s really fun and doesn’t take that long!
very usefull for merit badges, but the diagram are too detailed
this is really good but maybe next time make it less confusing
this is a boring thing, i could build a house with 3 rooms in a day!!!!!!
It would be cool if you could make a bird house out of this!
You could also put a small plastic bowl full of water on your feeder, so the birds could drink and bathe in it.
This is a neat idea! ☺