Make Your Own Homemade PVC Snowshoes
Webelos Scouts in the Daniel Boone Council in North Carolina use plastic CPVC pipe to make homemade snowshoes for their winter outings. Here’s how they do it.

WHAT YOU’LL NEED (makes one pair)
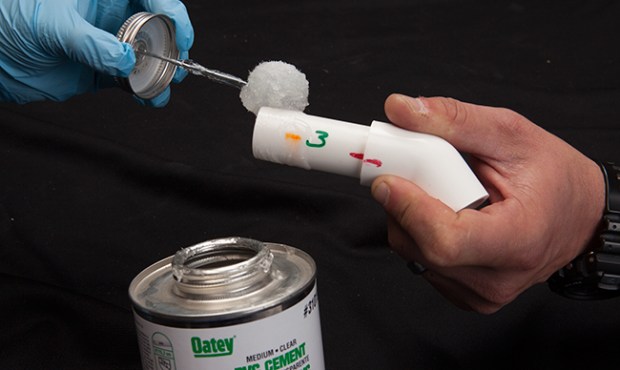
- 1 six-ounce can of CPVC clear cement
- 2 pieces of ¾-inch hot/cold CPVC pipe, each 10 feet long
(Although they look alike, CPVC piping will work better than PVC because CPVC tends to be a bit more flexible and less likely to crush. Schedule 80 is recommended.) - 4 ¾-inch CPVC pipe tees (they’re shaped like the letter “T”)
- 20 45-degree-angle CPVC elbows (they’re shaped like elbows)
- 200 feet of ¼-inch hollow braid poly rope
- Bungee cords, rope, Velcro or other materials to hold snowshoe to foot.
Tools
- Yard stick or measuring tape
- Hand saw, hack saw or PVC pipe-cutting tool
- File or sand paper
- Clamp vise or an extra set of hands
- Flat work surface
WHAT YOU’LL DO

1. Cut the 10-foot-long pipes to the following lengths:
- 2 pieces, each 4 inches long
- 2 pieces, each 8 inches long
- 4 pieces, each 6 inches long
- 4 pieces, each 18 inches long
- 6 pieces, each 1-1/4 inches long
- 8 pieces, each 3 inches
You should end up with 26 cut pieces of pipe.
2. Using a file or sand paper, deburr — or smooth — the cut edges.
3. On a flat work surface, start building the front section of the shoes following these steps. The shoe is built in two halves; start with the front half and glue the pieces in place as you go.
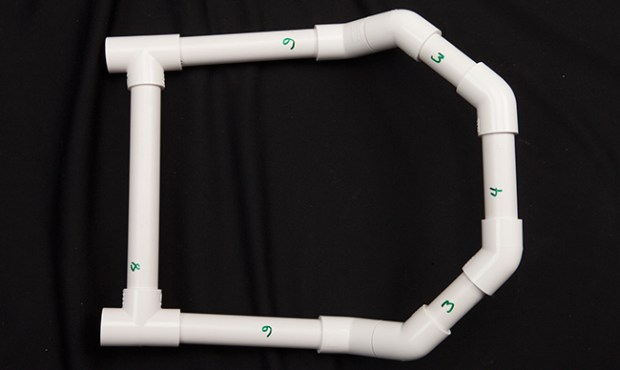
Front Half
1. Put one 45-degree-angle piece of piping on each end of one 4-inch piece of pipe.
2. Put a 3-inch pipe into the open end of both angles.
3. Put another 45-degree angle on the open end of each 3-inch piece.
4. Put a 1 1/4 inch pipe into both angles.
5. Put 45-degree angle pieces onto the 1 1/4 inch pipes. Angle should face up slightly.
6. Put one 6-inch piece into each of the angles.
7. Put one T-angle joint onto the end of each 6-inch piece, then connect with 8-inch pipe.
8. Set this half aside so the glue can harden.
Remember to continue gluing the connections as you go!
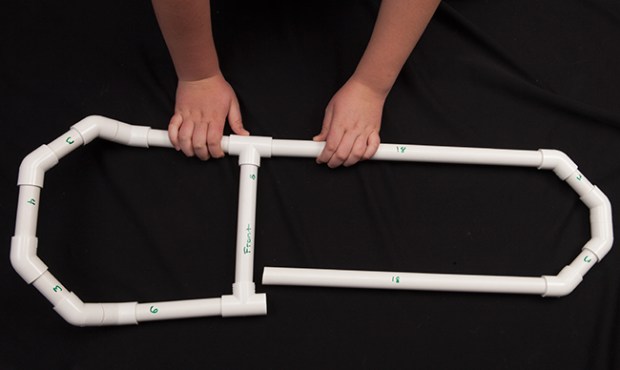
Back Half
1. Put 45-degree angles on one end of each 18-inch pipe.
2. Put a 3-inch piece into each angle.
3. Put 45-degree angles onto both 3-inch pieces.
4. Connect the 45-degree angle pieces with a 1 1/2 piece of pipe.
5. Connect the back and front halves of the snowshoe together and let dry for 24 hours.
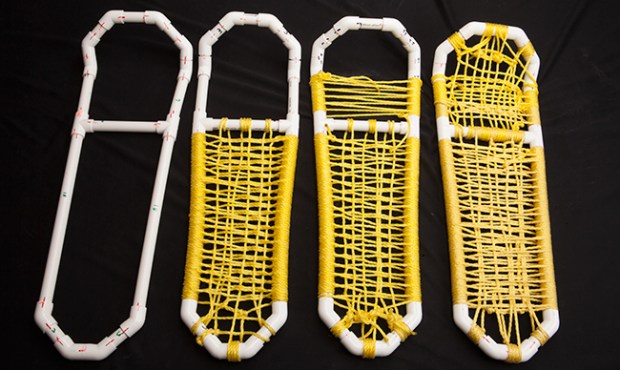
Lacing the Shoe
Use an eye splice to start and end all lacings. Weave the rope back and forth around the pipe in an over-under pattern to create lacings.
Keep the lacings in place by using CPVC cement where laces meet the pipe.
Attach to foot (boot or shoe) using bungee cords, rope, Velcro or other materials. For best results, attachment method will be similar to an ankle brace bandage.
PHOTOS OF COMPLETED PROJECT
Check out these photos of the completed project sent to us by Boys’ Life readers. If you have a photos of a BL Workshop project, please use the form below to send them to us.


Leave a Reply to Poppy Cancel reply