How to Build a Ship in a Bottle
Building a ship in a bottle only looks mysterious. With patience, skill and a few tools, you can finish a bottle craft while your friends wonder, “How’d he do that?”
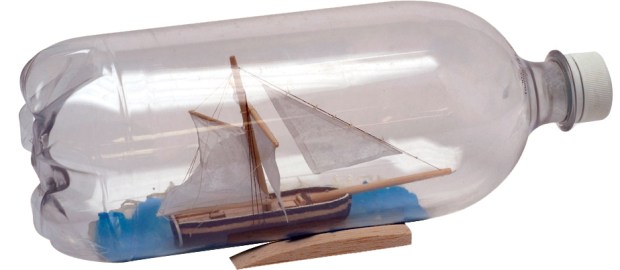
Construct the ship outside the bottle and attach the sails face down with hinges. Slip the ship inside the bottle. With a pull of a string, the ship’s sails pop up.
WHAT YOU’LL NEED
- Raingutter Regatta Kit (scoutstuff.org)
- Plastic 3-liter soft drink container
- Bamboo skewer or 1⁄8-inch dowel
- Hobby basswood
- Black and tan quilting thread
- Florist’s wire
- Tissue paper
- Straight pins
- Shellac
- Blue paint
- White glue
- Epoxy
- Sandpaper
WHAT YOU’LL USE
- Knife
- Scissors
- Tweezers
- Pin vise drill
- Nail clippers
- Paintbrush
- Cotton swabs
- Steel ruler
- Pencil
WHAT YOU’LL DO:
 STEP 1: Remove the label from the 3-liter bottle. Clean it inside and out. Paint a blue rectangular section (long ways) about 2 1⁄2 inches by 7 inches on the inside. This will be the water.
 STEP 2: If you are using the traditional Raingutter Regatta hull, trim it so it is about 1 inch wide. Glue the discarded pieces to the outside of the bottle as a base.
For the new Raingutter Regatta Trimaran hull, glue the two balsa wood outriggers together. Trim it to 1-inch wide and shape to match the illustration.
 STEP 3: Cut the bottom off the hull so it is 1⁄2 inch deep. It should now fit through the mouth of the bottle. Cut off the hull in front of the mast hole, and shape the hull so that it looks like a ship above the waterline. Round the bottom corners of the hull. Sand and seal with shellac.
 STEP 4: Cut the mast from your raingutter regatta kit so that one piece is 3 3⁄4 inches long. This will be your model’s mast. Use the rest for the bowsprit (the thing that sticks out in front of the ship). Drill a small hole near the bottom of the mast and near the end of the bowsprit.
 STEP 5: To get your model into the bottle, the mast has to be hinged. Take a 2-inch piece of florist’s wire and put it through the hole in the mast. Bend it into a U to make a hinge. Drill two holes in the hull, and put the wires through the holes. (Try swinging the mast up and down.) Bend any excess wire against the bottom of the hull.
 STEP 6: Epoxy the bowsprit to the hull with the hole on the far end. Let it dry overnight.
STEP 7: Cut three pieces — 3 1⁄2, 2 1⁄2 and 1 1⁄2 inches — from the bamboo skewer or dowel. These sticks hold the sails. The long one (the spar) holds the main sail. The short one (the gaff) holds the top of the gaff sail. The middle one (the boom) holds the bottom of the gaff sail. Drill holes through the base of the shortest sticks.
 STEP 8: Make the sails using these patterns. Make a 1⁄8-inch seam on each edge. Fold over each seam and glue. Fold the long edge of the triangular sail (the jib) over a 10-inch length of tan thread. Glue the thread inside the seam with 3 inches at either end.
 STEP 9: Tie three black threads 1⁄2 inch from the mast top. Three lines will hang down on each side (shrouds). Tie one end of a 2-foot length of black thread near the mast top (the stay).
 STEP 10: Tie the long stick to the front of the mast, the shortest one to the back of the mast near the shrouds and the remaining stick to the back of the mast about 3⁄8 inch from the base. Tie a loop through the hole in the base of the two backwardpointing pieces, then tie that loop to the mast. All three sticks should swing freely.
 STEP 11: Push three pins into each side of the hull behind the mast, 1⁄8 inch apart. Push a pin into each side of the hull near the stern.
 STEP 12: Thread the stay through the bowsprit end hole. Pull the mast until almost upright. Wrap the thread around the end of the bowsprit 20 turns. Do not tie!
 STEP 13: Tie the shrouds to the pins. Alternate sides. Make sure that the mast does not lean to one side. All lines should be taut. The mast cannot move.
 STEP 14: Tie the tan thread to the sticks to keep them from moving. The piece in front of the mast, the spar, has a line running from the end of the spar to the pin at the back of the boat. The two pieces behind the mast have three lines that hold them in place. One line runs from the tip of the piece to the top of the mast. Two other lines run from the end of the stick to the sides. Tie one line on each side. Once all three lines are tied, the piece cannot move.
 STEP 15: Glue the main sail and gaff sail in place. Tie the jib to the stay. Let dry overnight.
 STEP 16: Unwrap the stay, and loosen it. Push the mast back. Gently fold everything along the mast. When everything is pointing straight back, your model should fit into the mouth of the bottle.
STEP 17: Spread epoxy in the bottle in the middle of the “water.” Slide the ship into the bottle and onto the epoxy. Position it with a rod. The end of the stay hangs out of the bottle. Let the glue dry.
 STEP 18: Pull the stay. Watch the mast come up, and the mainsail swing out. Once the stay is taut, glue it at the bowsprit. Let dry. Cut off excess.
BUILDING A BETTER BOAT
Improve your boat’s appearance with a few tweaks.
First, taper all of the sticks. Real masts, booms, bowsprits and gaffs are thinner at the end than at the base. The spar is thinner at the end than at the middle.
Next, add detail to the hull. Most ships have a wall—called a bulwark—around the edge to keep people from falling overboard. Use cardstock, cardboard or small wooden strips to make the bulwark.
Finally, add details to the hull. Ships like this steer with a tiller. They have hatches and skylights so you can load stuff and get light below decks.
i dont think this was written by a real person
why?
Really nice post. I appreciate your skills, Thanks for sharing.
Excelente!! Gracias!!
Nice… BUT… WHAT ON EARTH IS THE RAINGUTTER REGATTA?!?!
Pretty cool idea! A piece of driftwood from a lake or ocean also works well for the ship, though. *****
Where do you get the kit for that??? Five star though!🌟🌟🌟🌟🌟