Make a can lantern
Put a used coffee or food can to good use by making this rustic lantern.

WHAT YOU’LL NEED
- 13 oz. metal coffee can or large food can. The food can should be no smaller than about 20 oz.
- Can opener (if needed)
- Paper and pencil for drawing your design
- Transparent tape
- Common wood nail, the right size to punch the holes in the can. If you create a complicated design, it helps to use a smaller nail.
- Hammer
- 2-3 votive candles
- 1″ x 3″ x 3′ board (narrow enough to fit into the can)
There are two ways to secure the 1″ x 3″ board. You can use the vise method or wood-clamp method.
The wood-clamp method
- 2″ x 4″ x 2′ board
- 4 2″ wood screws
- Screwdriver
- 2 wood clamps
- Sturdy bench or table
The vise method
- Vise
- Workbench
WHAT YOU’LL DO
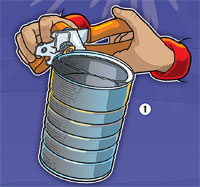 1. Remove the paper label from your can. If the can has a shelf, remove it with a can opener.
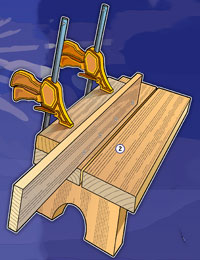 2. If you’re using the wood-clamp method, screw the 1″ x 3″ board onto the 2″ x 4″ board as shown. Clamp the boards to a sturdy bench or table.
 3. If you’re using the vise method, clamp the 1″ x 3″ board into the vise.
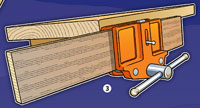
4. Draw a design on paper that fits the size of the can, or click here to download a sample template (may need to be resized to fit can). Tape the design to the can. Slide the can over the 1″ x 3″ board.

5. Follow your design and punch out the holes. Do one or both sides of the can.
6. Place the candles inside the can. The inside of the can will be rough and jagged, so use caution when putting the candles inside.
Leave a Reply to Jones Cancel reply