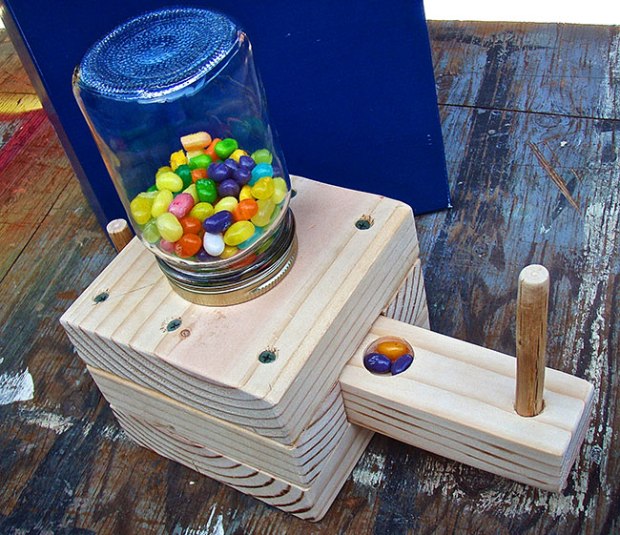
Make a Homemade Candy Dispenser
You can make this dispenser for jelly beans, gumballs or any other hard candy that will fit in it.
WHAT YOU’LL NEED
- 2″ x 6″ board, 24″ long (The actual size of a 2″ x 6″ board is 1 1/2″ x 5 1/2″.)
Cut the board as follows:
- 2 1 1/2″ x 5 1/2″ x 5 1/2″ boards (top and base)
- 2 1 1/2″ x 1 3/4″ x 5 1/2″ boards (sides)
- 1″ x 1 7/8″ x 11″ board (slide)
- Tape measure
- Pencil
- Pocketknife
- Sandpaper
- Wood glue
- 1 dowel or peg about 1/4″ in diameter, 4″ long
- 1 dowel or peg about 1/4″ in diameter, 2″ long
- A clean quart or pint canning jar with its metal ring
- Crosscut saw for sawing across the grain
- Ripsaw for sawing with the grain
- Drill
- Drill bit, sized for pre-drilling 2 1/2″ holes
- 7/8″ spade bit
- Countersink bit (so driven screws are flush)
- Screwdriver
- 12 wood screws, 2 1/2″ long
- 4 flat-head brads for nailing jar ring to top of dispenser
- Small drill bit for pre-drilling brad holes in jar ring
- Jelly beans or gumballs
WHAT YOU’LL DO
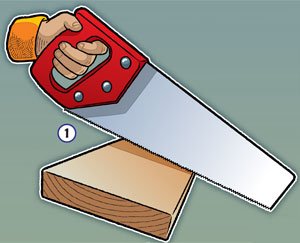 1. Cut all the boards to size and sand smooth.
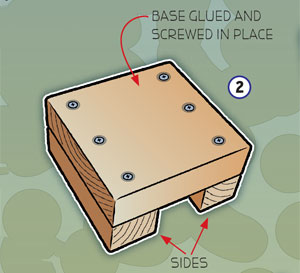 2. Glue and screw the base onto the sides.
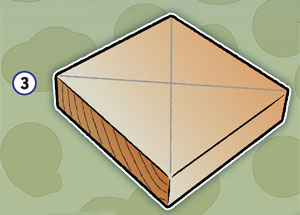 3. Pencil an X from corner to corner on the top board.
 4. Drill a 7/8″ hole through the center of the top board.
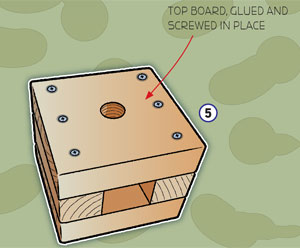 5. Glue and screw the top board onto the sides and base. Sand the slide until it moves smoothly in the square hole in the center of the dispenser.
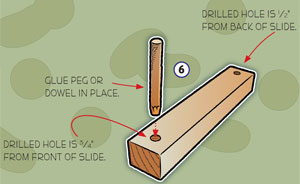 6. Drill a hole 3/4″ from the front of the slide. This is for the 4″ peg or dowel. Drill a hole 1/2″ from the back of the slide. This is for the 2″ peg or dowel. Glue the 4″ peg or dowel in the front hole on the slide.
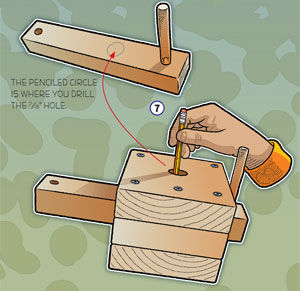 7. Push the slide into place until it stops at the 4″ peg. Draw a circle through the 7/8″ hole on the top board onto the slide.
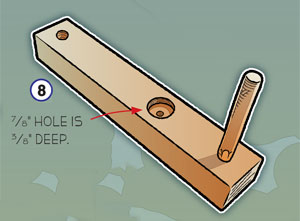 8. Drill a 7/8″ hole 3/8″ deep into the slide as shown.
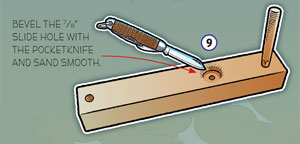 9. Bevel the 7/8″ slide hole with the pocketknife and sand smooth.
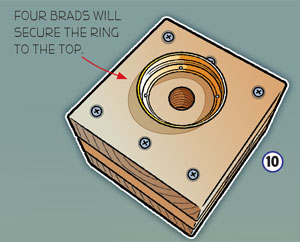 10. Drill and nail the jar ring onto the top board.
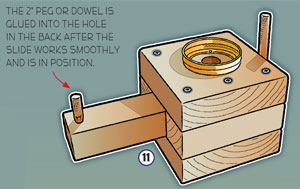 11. Push the slide into place. When the slide is pushed in all the way, the hole in the top and the hole in the slide should line up. Glue the 2″ peg or dowel onto the back of the slide.
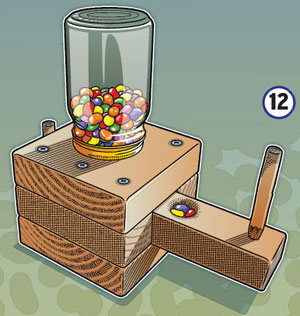 12. Fill the jar with candy, screw it onto the ring and your dispenser is complete.
PHOTOS OF COMPLETED PROJECT
Check out these photos of the completed project sent to us by Boys’ Life readers. If you have a photos of a BL Workshop project, please use the form below to send them to us.


it was okay the candy would get stuck once in a while but then once you got it out it would start working again.
Very Straightforward and Simple to understand instructions. Kids grasped the concept very well. Thank you for such detailed instructions.
it looks confusing tbh but whtyever
the pictures r confusing
How much does it cost
The trick is to bevel the backside of the slide hole much more than shown in the picture. It should look like a ramp going down into the hole. Then the excess candy can ride the ramp back up and out of the way when you pull the slide forward.
Unsalted nuts
Candy gets stuck and doesn’t allow it to work properly.
THIS WAS AWESOME!
It is good but make a video pls.
Totally rad, bro!
The measurement for the board slide should actually say 1 1 1/2″ x 1 7/8″ x 11″ board (slide). The first measurement of the slide board is missing. I did find I needed to shave about 1/8″ (a saw blade width) of that 1 1/2″ side so the slide would not bind.
Please learn how to spell, people!
Great project! My kids had a great time making it. Be sure not to use treated wood.
make a video
Candy gets stuck and jams. Any suggestions?
U could build out of lego, it would be a lot easier. I’m building it out of legos with my little brother.
Just finished, it was a lot easier then wood!
LEGOS!?
this doesn’t work.
Can someone make a video so it is easier to follow
hey guys
I think the measurements for the slide board are incorrect. Shouldn’t it be the same height as the side boards? You have the side boards a 1.5″ tall and the slide board as 1″ tall. I would think the gap would cause problems holding the candy in.
Did not work at all.
Yes the gap of half inch is too big… Most candy will fall through and be everywhere. Make the slider piece so there is around 1/4″ or less wiggle room top sides. Also we drilled the hole in the slider piece all the way through so you don’t have to dig the candy out. Place hand underneath and into your hand it goes. Great project!
Did not work at all
Great plans! Very easy to follow. Thank you!
Get money for me I got someting
I want to make it too But My family never buys candy
i liked it but i thank that u should have made a video