Build a Log Cabin Birdhouse
Attract birds to your backyard with this fun and stylish log cabin birdhouse.
WHAT YOU’LL NEED
- 7″ x 8″ cedar floor board
- 7″ x 9″ cedar roof board
- 6 1/4″ x 9″ cedar roof board
- About 50 1/2″ x 7″ straight branches (if you use branches found on the ground, make sure they are solid and not rotting. You can also use fresh branches that have been recently pruned.
- 2 1/2″ x 8″ branches for the base of the porch
- 1/2″ x 18″ branch that you will later cut for the porch, door and perch
- 3/4″ x 9″ branch for the ridgepole
- About 82 3/4″ brads (small nails)
- 14 1″ brads for nailing on the ridgepole and roof
- 3 1-1/4″ exterior wood screws for screwing the roof together
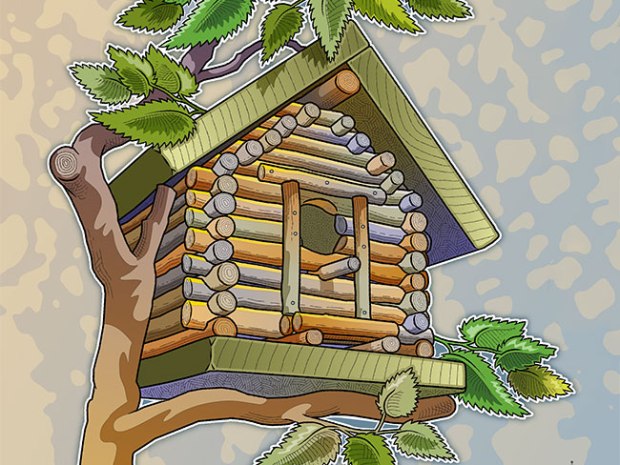
- Pocketknife for trimming any burs from branches
- Ripsaw
- Crosscut saw
- Pruning shears or fine-toothed saw for cutting branches
- Drill
- 1/16″ drill bit to predrill nail holes
- 1/64″ drill bit to predrill screw holes
- 1-1/2″ hole saw
- 1/2″ hole saw
- Countersink bit for setting the screws flush with the roof surface
- 1/2″ cylinder rotary rasp for carving notches in branches
- Small hammer
- Nail punch
- Exterior wood glue for attaching the perch
- Sandpaper for smoothing ends of branches
- Paint and primer for the roof and floor
WHAT YOU’LL DO
 1. Cut out all the parts of the birdhouse, including the branches. Prime and paint the roof and floor. Screw the roof together.
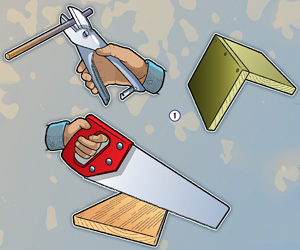
 2. Using the rotary rasp, grind the branch notches as shown.
Notches should be 1/8″ deep and 1/2″ wide. They should be about 1/2″ in from the end.
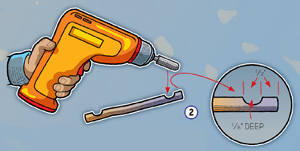
 3. Attached the first two 7″ branches by predrilling and nailing them to the floor.
Branches should be flush with the back of the floor and about 1/2″ in from the side. Leave a 1″ space at the front to make room for the porch.
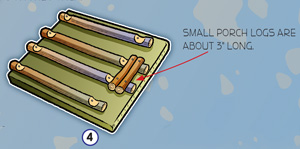 4. Nail the 8″ porch branches to the floor and add the two 3″ crosspieces as shown.
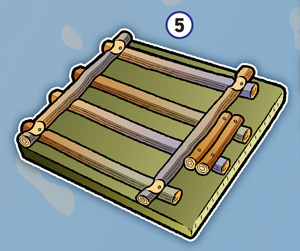 5. Continue to add branches to the front, back and sides until you reach the eighth branch.
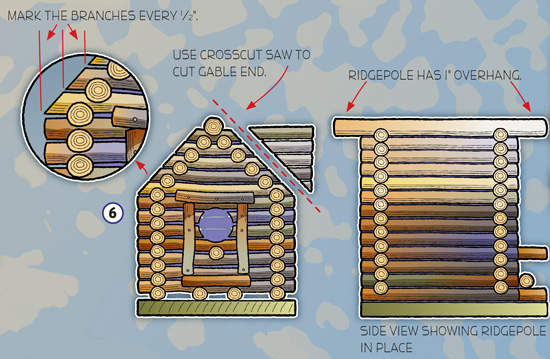
6. With the eighth branch, start angling the notches toward the peak. Each notch is 1/2″ in from the one below it as shown. Work your way up to the peak. Nail the door frame in place. Drill a 1 1/2″ hole about 3″ up from the floor within the door frame. Drill a 1/2″ hole below the larger hole and glue in the perch. Cut the gable ends as shown. Nail on the ridgepole.
 7. Nail on the roof, and your birdhouse is complete.
Boy’s Life’s make-something section is really going to the birds. XD
I’m going to use Lincoln Logs.
This looks awesome!!! I am defiantly going to try this!
I am going to make this but it looks hard.Get rid of the sticks on the bottom of it.
i hope it is warm enough for the birds. –_–
hard very hard
Wow, thats cool!
It should be made clear that this structure is for decorative purposes only. The perch below the entrance hole makes it attractive to house sparrows, an invasive species. The lack of clean-out access is a major flaw as well. Given this, it does not matter how it is or is not sealed.
hours into this project, not as easy as it looks. rotary rasp a bit dangerous for fingers. not giving up hope yet
Here’s a very interesting birdhouse design. I’M SURE, there’s a market for these!!!!
Tweet-tweet!
I’m an old Boy Scout (my 33rd active year), but I’m going to make this! 😀
Great idea, questions… How is this cleaned out (a necessity) What do you suggest to place between the branches(logs) to seal out the drafts? The bottom rows would be the most important to seal, while openings near the top would provide needed vents.