How to Make a Rustic Twig Table
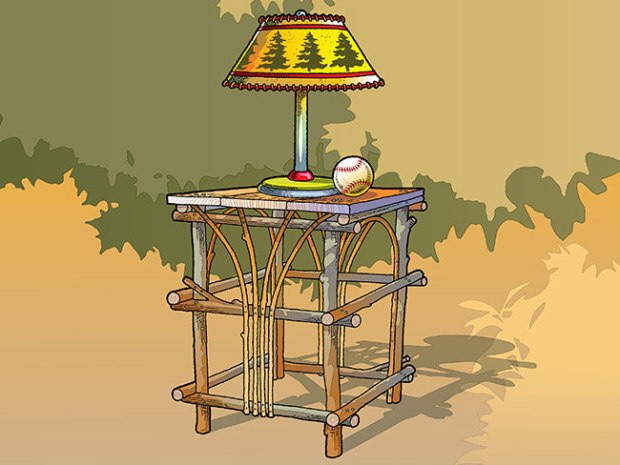
Twig, or bent willow, furniture was popular in the United States and England during the 19th century. With a few tools and some twigs and branches, you can make this durable rustic table today.
WHAT YOU’LL NEED
- Pruning shears
- Pruning saw
- Knife
- Hammer
- Tape measure
- Drill
- Two sizes of ribbed paneling nails. The large nails are for the frame; the small nails for the flexible pieces you’ll bend.
- Four legs, 2 inches in diameter and 24 inches long
- 12 cross pieces, 1 1/2 inches in diameter, 16 inches long
- Eight flexible pieces, 1/2 inch in diameter, 36 inches long
- Two flexible pieces, 1/2 inch in diameter, 72 inches long
- One 4 1/2-foot board, cut into three pieces
- One 2-foot 1×2 board, cut in half
- 28 1-inch nails
CHOOSING YOUR MATERIALS
Willow is still commonly used to make rustic furniture, but almost any wood will work. Birch, ash, maple and even alder bend just fine. Wood becomes less flexible as it dries out, so it’s important to build your table soon after cutting the materials. Stay away from conifers like spruce and pine unless you don’t mind sticky sap covering everything you own.
WHAT YOU’LL DO
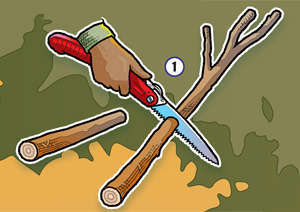 1. Cut your materials to size. The material diameters suggested are approximate. Use a sharp knife to take off any unwanted rough spots or bumps.
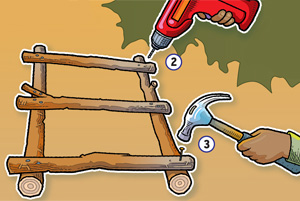 2. Attach three cross pieces to the legs by first drilling holes slightly smaller in diameter than the nails. Drilling a hole for each nail will prevent the wood from splitting when it dries.
3. Work your way around using two nails at each contact point. Make two identical frames. These two frames will be the front and back of your table.
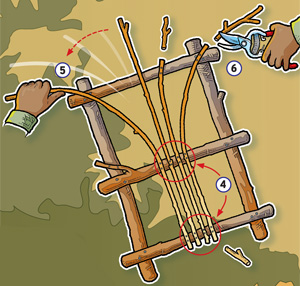 4. Drill and nail four 1/2-inch twigs onto the bottom and center cross pieces.
5. Carefully bend each piece into position, then drill and nail them into place.
6. After each twig is attached, use the pruning shears to trim to length. Complete both the front and back frames.
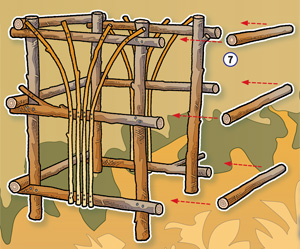 7. Drill and nail the front and back frames together using the remaining six cross pieces.
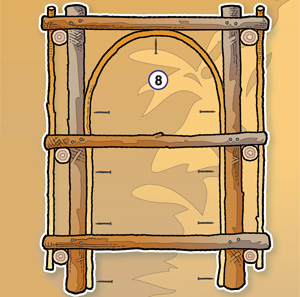 8. Carefully bend and attach an inside arch as shown. Drill and nail it into place. When the table dries, the wood will shrink and grip the nails tightly.
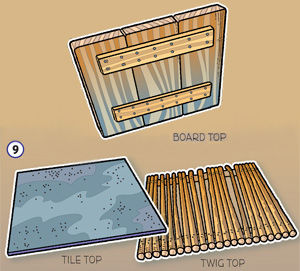 9. Make the 18-by-18-inch square top from boards by nailing the 2-inch boards as shown.
PHOTOS OF COMPLETED PROJECT
Check out these photos of completed twig tables by Gunnar and Eric Johansson, two Scouts from Smithtown, N.Y.
If you have a photos of a BL Workshop project, please use the form below to send them to us.


RESPECT PRIVATE PROPERTY
Make sure you get permission from land owners before going onto private property. If you don’t have access to wooded property, tree-trimming crews can be a good resource for materials.
Thanks for such a complete guide to building a table. Love it.
good
Can’t wait to build this!😃
I want to build one tomorrow I have access to wooded property!
awesome
When my son was in WeBeLoS he made this table for me for mothers day. He saw it in boys life and to my surprise … he asked his father if they could make it. It still sits in my living room 4 years later. It is beautiful and it was pretty simple to make.
Nice .. 😀 and very interesting .. scout project
cool!