Make your own weather instruments
Learn more about weather and meteorology by completing these weather-related projects.
MAKE A WIND VANE
A wind vane measures the direction of the wind.
What You’ll Need
- Aluminum baking dish, pie tin or tray that’s thin enough to cut
- Wooden garden stake that’s at least 3 feet tall and 1 inch thick
- 12-inch-long, 1-inch-thick piece of wood
- 2- to 3-inch-long nail
- Drill
- Metal washer
- Hammer
- Mallet
- Glue
- Small saw
- Scissors
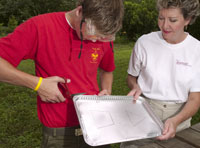
What You’ll Do
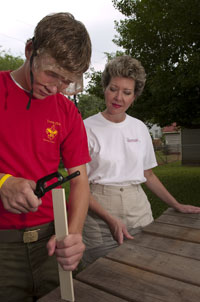 1. Using the mallet, drive the garden stake into the ground until it feels sturdy. Choose a location that’s outdoors and relatively clear of anything that would obstruct the wind.
2. Using the saw, cut a half-inch slot into each end of the 12-inch-long piece of wood.
3. With the help of an adult, place the piece of wood on top of the stake, and drill a hole through the wood and into the stake. Use a drill bit that’s slightly larger than the nail you’ll be using.
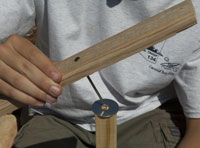 4. Place the washer on top of the stake, and insert the nail through the wood and into the stake. The piece of wood should be free to rotate but not fall off.
 5. Cut an arrowhead and tail out of the aluminum, and glue them into the slots on each end of the wood.
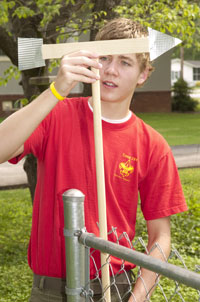 6. Wait for the wind to blow, and watch as your vane turns to point in the same direction.
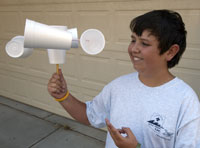
MAKE AN ANEMOMETER
An anemometer measures the speed of the wind.
What You’ll Need
- New sharpened pencil
- 5 plastic foam cups
- Hole punch
- Straight pin
- 2 long plastic straws
- Felt marker
- Tape
What You’ll Do
 1. Mark a number “1” on one of the cups and set it to the side.
2. Poke four holes evenly spaced apart in the sides of the cup by plunging the pencil straight through both sides. Make sure one set of holes is slightly lower than the other.
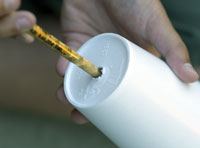 3. Poke the pencil through the bottom of the cup, then pull it out, turn it around, and push it through the hole again, this time with the eraser side up.
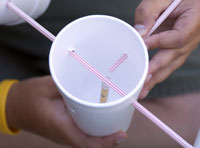 4. Thread straws through the holes of the cup so that they cross in the middle. Tape the straws in place.
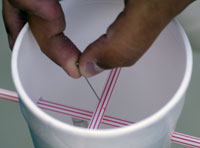 5. Push the pencil up until the eraser touches the straws at the point where they cross. Push the straight pin through the straws and into the eraser so that the straws are held in place, but the cup can still spin around the pencil.
6. Using the pencil, poke one hole in the side of each remaining cup. Mount each cup on the straws.
 7. Hold the apparatus by the pencil, wait for the wind to blow, and watch it spin. Count the number of revolutions the marked cup makes in one minute to track the wind speed.
MAKE A RAIN GAUGE
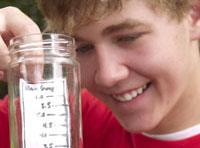 A rain gauge measures the amount of rain.
What You’ll Do
You can make a rain gauge out of any kind of measuring cup left outside when it rains.
If an old measuring cup isn’t handy, cut the top off of a plastic water bottle. Use a ruler to measure how much water the bottle collects after a rainfall, or, better yet, use a waterproof marker to make inch marks on the side of the bottle.
COOL
So not used 2 this. LOL
I guess I just gotta use this for online school
Oh yeah yeah oh yeah yeah
perfect for doing a project!!!
Thanks a lot! I’m going to use these to wrap up one of my Venturing Novas!
awesome
magic is cool
Ha ha looks hard is it I do not feel like doing it it looks kind of hard.
I liked how it showed all the steps and it made to make the project
This is awesome
cool
cool
wow…this website helped me a lot but I wish it had more options
So gooooood
me to
It came in use for homework
Really helped me for a last minute project!!!!!!
cool am I right
thanks for helping m to do my homework it is very awesome and very cool
nice
very poor project
To much work
Very very poor
well thats not that nice!
I love it.
This helped me a lot out with making the anemometer for class
In class we had to make anemometer , I was not excited then when I found this
Website it made life a lot easer.
nice
Very cool!
coooooool nice
Love it
I was trying to make a wind vane,but it was sure hard.
this soooooo thank you for provideing this information.
Cool !
borin… just kidding its interesting…
ahhhhh so borin!!!!
you need to put in a barmoneter
i just want to make the rain gauge, but I’m still saving this to my favorites list
how do you make a barometer
this realy works
😉
so hard
looks really hard and boring!
but,,,,,,on the other hand it will help me with school so…i guess its ok !!!!!
What a great idea on the anemometer! We are studying weather in our after school club. What is the formula to calculate the number of spins for wind speed?
Wow, great timing! We JUST got notice that we have to make a weather instrument as a project for school!
this is cool! 🙂
i really need to do this!