BL Workshop

Speed Secrets of the Pinewood Derby


Packs around the country are preparing to hold their annual pinewood derby. There are many ways to make your pinewood derby car go faster. Here are some of them.

GENERAL GUIDELINES FOR PINEWOOD DERBY CAR DESIGN

The possibilities are endless when it comes to picking a shape for your pinewood derby car. Before you begin, consider the following guidelines:

NEED IDEAS?

See a slideshow of more than 100 cool pinewood derby designs created by Boys’ Life readers

Avoid designs with a pointed nose. A pointed nose will make it difficult for your pinewood derby car to rest on the pin at the starting gate. It may also cause your pinewood derby car to get bumped around when the pin drops, and it can create problems for electronic timing systems.

Leave enough wood in the rear of the pinewood derby car so you can place additional weight there. You will end up putting most of the weight in the rear of the pinewood derby car.

Be sure that it is very clear which end of your pinewood derby car is the front and which end is the back. In many races, the race officials—not you—will actually place each pinewood derby car on the track. Sometimes the officials put the pinewood derby car on the track backward because they can’t tell which end is which.
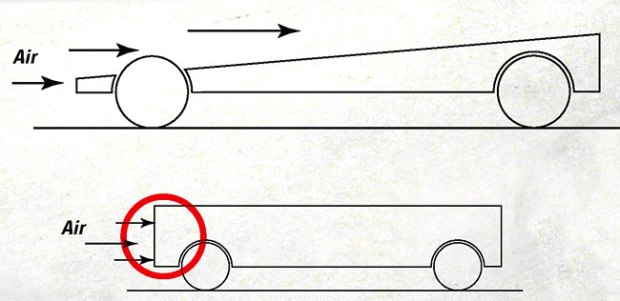
Choose a design that allows the air to move over and around the pinewood derby car body in a smooth manner. Pinewood derby cars with aerodynamic profiles go faster.

    DESIGNING THE ULTIMATE PINEWOOD DERBY CAR

    You don’t have to strive for the “ultimate pinewood derby car” to build a fast car and have fun competing in your pinewood derby. But if you and a helpful adult are willing to put in the extra time and effort, these tips are for you.

    LOOKING GOOD

    How to give your pinewood derby car that glossy finish

    Bake the Block: Start with your block of wood, and before you do anything else, bake it in the oven at 250 degrees for around two hours to remove moisture and make it lighter.

    Create the Design: Select a fast design.

    Cut the Design: Draw the outline of your pinewood derby car on a sheet of paper, cut it out and attach it to your block of wood.

    Make a Three-Wheeler: Raise one wheel about 1/16 inch higher so it never actually touches the track. Less friction = more speed.

    Extend the Wheelbase: The front and rear wheels should be as far apart as possible.

    Determine Weight Placement: A heavier rear increases speed. Add weight to the rear of your pinewood derby car.

    Create Glue Holes: Glue the axles firmly in their holes to ensure that they stay perfectly placed.

    Sand the Pinewood Derby Car: Make it smooth to reduce friction.

    Lubricate the Wheel Well: The less friction between the body and wheel, the better.

    CHOOSING YOUR AXLES

    Not all axles are created equal. Here’s a tip on choosing the straightest out of your bunch.

    derby1.jpg1. Start with a set of about 20 raw axles.

    derby2.jpg2. Can you tell the difference between the axles in the top row and the ones on the bottom? The ones on the bottom aren’t straight and will slow your car.

    3. To tell which are straight and which aren’t, mark each axle with a marker about 1/2 inch from the pointed end.

    derby4.jpg4. Have an adult clamp a power drill into a vise, a device that will hold it perfectly still.

    5. Have an adult help you clamp each axle into the drill at the location you marked in Step 3. Have the adult turn on the drill.

    6. Bent axles will wobble as they turn in the drill. Straight axles will hardly wobble at all. Pick the ones that wobble least.

    WANT MORE SECRETS?

    derby8.jpgPick up a copy of “Pinewood Derby Speed Secrets” (BSA Supply No. 30538, 1-800-323-0736, www.scoutstuff.org) for lots more info on building the pinewood derby car body, preparing the axles and wheels, alternatives to the “ultimate pinewood derby car” and putting it all together.

    derby9.jpgAnd once you’ve built your pinewood derby car, get ideas on making it look great from “Pinewood Derby Designs & Patterns” (DK Publishing, $12.95 softcover), also available from a BSA retail store.

    Remember: The No. 1 rule of a pinewood derby is that it’s supposed to be fun. While you should always strive to do your best, don’t get caught up in winning. Just enjoy the ride.

    Tags:

    Comments about “Speed Secrets of the Pinewood Derby”

    1. lumper01 says:

      how do i make a derby car go faster any ideas thanks!

    2. ExScoutDad says:

      My son and I had great experiences building his cars together; he doing the labor and me in a supervisory role. In addition to the tips already listed, don’t forget that a good, smooth paint job can make a difference too. Light sanding between coats and finishing with a clear coat will help your speed and ensure you car looks good on the shelf in your room for years to come. Have fun!

    3. hockeyman73 says:

      i got first in the pack thanks to this

    4. 360scout says:

      what should i use to enhance my wheels?

    5. momx6 says:

      In the BSA kit the axles(nails) have ridges in them, is it okay to sand them off?

    6. CRB Pack 121 says:

      Be sure to check your District’s rules before assuming these modifications are permitted. In our district, we must use only the materials in the derby kit (i.e., no precut cars from the hobby shop, non-BSA wheels and axels, liquid lubricant, etc.). Further, changing the wheelbase in many districts is a big no-no.

    7. Derby goof says:

      Terrific book!! I like the fact that the author keeps telling you to check your local pack rules. My son has about worn this book out!!! Great book! Thanks for helping many boys dreams come true.

    8. Malo says:

      Another speed tip: Use the power/cordless drill to polish off those burrs in the axle (nails) to gain more speed. Insert the nail tip in the power drill, tear off a 1/4″-1/2″ strip of 150 grit sandpaper, wrap it around the nail and polish that burr off first. Then use 320-400 grit after that, then work your way up. I go as far as 1000-1500 wet/dry paper to get is super smooth. Less friction=SPEED :)

    9. 0000 says:

      use the flakes of graphite and spin your weals

    10. Mark says:

      I am helping my son build his first derby car. The race is Jan. 28th. I have a question. The wood block comes with the axle slots in it already. Do you just hammer in the axles and they stay in the slots without popping off the bottom? Seems like they would come off the car a lot… Any advice would be great!

      • Malo says:

        Correct, it will not go out the bottom of the slot. Also, don’t use a hammer because you could bend the nail. Line it up well and push it right in with your finger or with another small piece of wood…Press fit

        • Mark says:

          Ok, thanks. We are baking the block today and are going to band saw out the car design. I will make sure we do not hammer the axles in.

      • dumboy says:

        it depends the way you want it.But I think maybe if you pound them in, it would keep the wheels on better. But I can’t guarantee the car will go fast.

        Good luck!

      • #1 baseball fan says:

        Sometimes it helps to put a wheelguard over the axles. You could put a dab of glue near the axles just in case. Do NOT get glue on the wheels. I have a friend that put glue on his axles, and overnight the glue seeped onto one of the wheels. !t didn’t spin at all. Be careful and have fun!

      • fishingxprt says:

        You can leave them just hammered in, but Ive been racing a wile and i recamend you super glue the bottom.

    11. Mik says:

      Boys life is great!!

    12. dsingh says:

      what is the scientific reason to make it the heaviest so its the fastest

      • DerbyPhysics says:

        Larger mass means larger momentum. The larger the momentum, the longer it takes the frictional force to reduce the speed to 0.

    13. PMac says:

      About half the tips in this article are illegal in our derby and would not past inspection. Glue on the axel, 3 wheels touching, Extending the wheel base are all against the rules, so make sure you know your rules before doing any of these tips.

      • Derby goof says:

        Good point!!! In our pack it is legal to have three wheels touching and an extended wheel base. However; when in doubt check with your individual pack, district rules.

    14. jamelyng says:

      Can anyone tell me the purpose of baking the block and making it lighter?

      • Stringnalong says:

        Drying the wood eliminates extra weight from the block of wood. The only weight you want to add to the car is some type of metal. There are different densities from different materials you can use. The idea is to have all your weight as low as possible, (center of gravity). It gets pretty scientific after that. Only doing 1 little thing wont make much difference in the speed of the car. But, if you do 10 little things, that is the difference maker. Good Luck!

        • eagle1 says:

          Nice tip on the “10 little things” – we’re talking mini-seconds with each “little thing” but they do add up..

      • gulpster says:

        The purpose is to extract as much moisture as you can from the wood. Moisture is weight, and since you will be adding weight with painting, why not cancel some of that weight by eliminating water that serves no purpose from the wood.

      • Derby goof says:

        Supposedly to make the block lighter to add more non wood weight. The problem with baking the block is that it will more than likely cause the block to shrink a little amd warp. This will leave you with a block that is not square!! The block would have to be vertically grained to minimize this. Most blocks are slab grained with the grain not running at 90 degree angles from top to bottom.Don’t bake the block!!!

        • Dave says:

          To add to this, if you bake Revell brand blocks that are made in China, sap will begin to ooze out. Yep, they aren’t using kiln dried wood so you wind up with a block that is useless because your car will weigh more on one side or the other.

    15. Scouting 9212 says:

      Here is the real secret: Let the boy make the car with your help. Don’t do it for him. Teach him that all ideas are valid. As adults we want to win, as youth, they just want to have fun. Enjoy your derby even if you don’t use all these speed secrets.

    16. turboshark10 says:

      I was the youngest scout to make it to the finals and I’m confident that with this help I’ll get 1st place for sure!;)

    17. Soggy Bottom Boys says:

      Our pack is FULL of people that say ‘I don’t like that’ or ‘that’s not fair’ What is fair is that you follow your rules and spend time with your boys making and creating the car. My boys design the car, paint the car and I help it GO (faster) I use as many tips as i can get and pass it on to them so they will do them later

    18. shnasta says:

      Derby rules for us is to use BSA derby axels.

    19. AwesomeMan says:

      I love this! I will try it!

    20. Jill says:

      For Pinewood purposes, the nails in your kit are called “axles.” Most packs cannot use real “axels” on thier cars. But those look COMPLETELY different than nails.

    21. Racer X says:

      Remember, do your best on your wheels and axles, but it is the wheel alignemnt that wins the race. The Scout stores have some great tools for building a great car and getting a good alignment.

      • Derby goof says:

        I agree about wheel alignment also proper weight placement. My son who placed first overall in his pack and district events two years in a row spent a lot of time with his alignment and weightt placement. The average time for his car in 2011 on a 42′ aluminum best track were 2.9500 seconds. His best time was 2.9014! Weight placement and alignment are the best tips for any body. It was a shame that he was too ill to race in our region race. Nice chatting with you.

    22. mw3 says:

      what about the wheels?

    23. stickler... says:

      I don’t like the idea about raising one wheel to cause less friction…that doesn’t sound fair. Not to mention it is a four wheel vehicle….no where does it say you can use 3 wheels that I have seen.

      • flatlander says:

        It’s a simple trick and doesn’t cost a dime. You still have four wheels on the car. Unless your rules prohibit it, you’ll probably end up with at least half the cars with 3 wheels touching the track just by sheer accident. You’d be suprised how many cars show up with a raised wheel without it intentionally being built that way. It is “do your best”…..right?

    24. stickler... says:

      I don’t like the idea about raising one wheel to cause less friction…that doesn’t fair. Not to mention it is a four wheel vehicle….no where does it say you can use 3 wheels that I have seen.

    25. Cubmaster says:

      Before you build, ask. Nothing sucks the life out of a scout or the derby committee more than a car that does not meet the event specifications. While all of those ideas sound GREAT, and they probably work, some of them would violate the rules of your pack. district/ council derby.

    26. About the Kida says:

      so this is still for the boys right?? I mean most 7-13 yo boys can do this alone. Just make sure after you build it give HIM credit so he gets his awards.

    27. curly says:

      imade graphite ports as the car moves down the track it puts more onthe wheels.

    28. Rambo#1 says:

      2first places!

    29. shrimp says:

      Im trying it right now!

    30. Gomez says:

      I think this is real is cool because of the ideas

    31. me45 says:

      Reuse your already polished axles.

    32. dance girl says:

      I reccomand using nails instead of axles. We had a practice race 1 week ago and the people who use nails are more likely to win. I used axles but I lost. Hope I helped. Peace out :) )

    Write a comment about “Speed Secrets of the Pinewood Derby”

    Nickname:

    Type your comment: