Make Your Own Homemade PVC Snowshoes
Webelos Scouts in the Daniel Boone Council in North Carolina use plastic CPVC pipe to make homemade snowshoes for their winter outings. Here’s how they do it.

WHAT YOU’LL NEED (makes one pair)
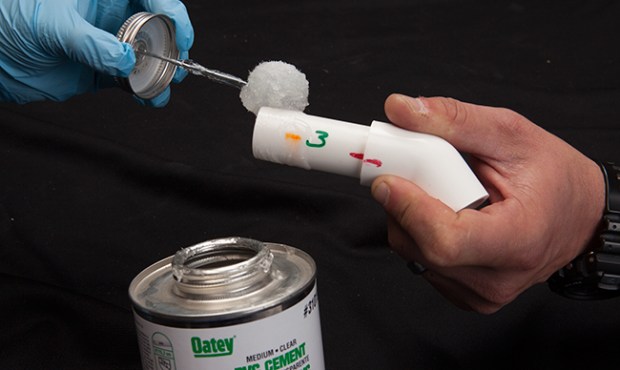
- 1 six-ounce can of CPVC clear cement
- 2 pieces of ¾-inch hot/cold CPVC pipe, each 10 feet long
(Although they look alike, CPVC piping will work better than PVC because CPVC tends to be a bit more flexible and less likely to crush. Schedule 80 is recommended.) - 4 ¾-inch CPVC pipe tees (they’re shaped like the letter “T”)
- 20 45-degree-angle CPVC elbows (they’re shaped like elbows)
- 200 feet of ¼-inch hollow braid poly rope
- Bungee cords, rope, Velcro or other materials to hold snowshoe to foot.
Tools
- Yard stick or measuring tape
- Hand saw, hack saw or PVC pipe-cutting tool
- File or sand paper
- Clamp vise or an extra set of hands
- Flat work surface
WHAT YOU’LL DO

1. Cut the 10-foot-long pipes to the following lengths:
- 2 pieces, each 4 inches long
- 2 pieces, each 8 inches long
- 4 pieces, each 6 inches long
- 4 pieces, each 18 inches long
- 6 pieces, each 1-1/4 inches long
- 8 pieces, each 3 inches
You should end up with 26 cut pieces of pipe.
2. Using a file or sand paper, deburr — or smooth — the cut edges.
3. On a flat work surface, start building the front section of the shoes following these steps. The shoe is built in two halves; start with the front half and glue the pieces in place as you go.
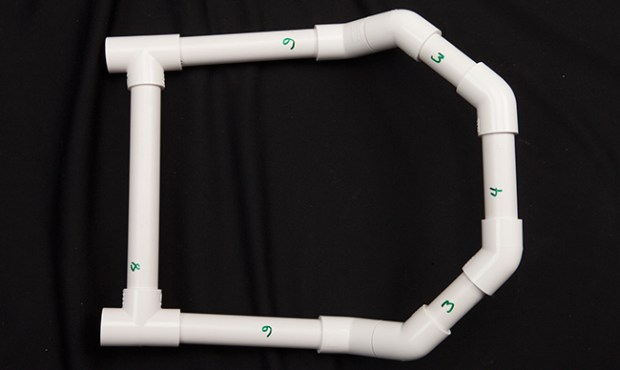
Front Half
1. Put one 45-degree-angle piece of piping on each end of one 4-inch piece of pipe.
2. Put a 3-inch pipe into the open end of both angles.
3. Put another 45-degree angle on the open end of each 3-inch piece.
4. Put a 1 1/4 inch pipe into both angles.
5. Put 45-degree angle pieces onto the 1 1/4 inch pipes. Angle should face up slightly.
6. Put one 6-inch piece into each of the angles.
7. Put one T-angle joint onto the end of each 6-inch piece, then connect with 8-inch pipe.
8. Set this half aside so the glue can harden.
Remember to continue gluing the connections as you go!
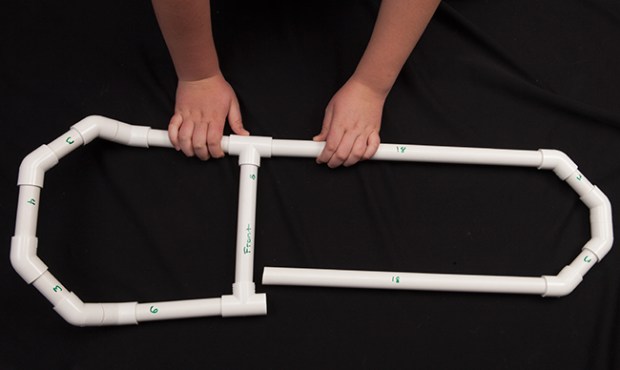
Back Half
1. Put 45-degree angles on one end of each 18-inch pipe.
2. Put a 3-inch piece into each angle.
3. Put 45-degree angles onto both 3-inch pieces.
4. Connect the 45-degree angle pieces with a 1 1/2 piece of pipe.
5. Connect the back and front halves of the snowshoe together and let dry for 24 hours.
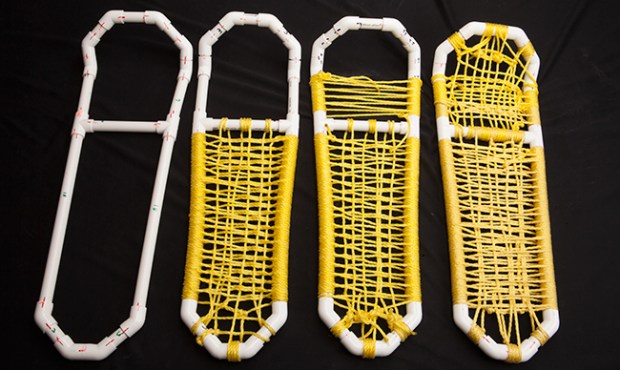
Lacing the Shoe
Use an eye splice to start and end all lacings. Weave the rope back and forth around the pipe in an over-under pattern to create lacings.
Keep the lacings in place by using CPVC cement where laces meet the pipe.
Attach to foot (boot or shoe) using bungee cords, rope, Velcro or other materials. For best results, attachment method will be similar to an ankle brace bandage.
PHOTOS OF COMPLETED PROJECT
Check out these photos of the completed project sent to us by Boys’ Life readers. If you have a photos of a BL Workshop project, please use the form below to send them to us.


You can also try to make them with pieces of wood. Try bending them in the bathtub full of hot water. That’s what I did! (And then I put a hole in the wall and we had to redo the bathroom. It definitely would have been cheaper for me to buy snowshoes for the whole troop.)
Is there any video out there as to how to start the weaving process ? I am having a hard time with the weaving part.
Take my word – BUY SNOWSHOES INSTEAD! After purchasing all the supplies we needed we could have easily afforded store-bought snowshoes. Also, this project takes FOREVER. We have already invested several hours and are only half way done. Seriously. Buy. the. snowshoes.
ha wish i had all the materials
Snowshoes are $140 MINIMUM.
To make it easier to back up and turn, I’m going to use extra 45s on the back end to give it a slight upward lift. This is a copy of a design seen on a snowshoe for sale. Will be making mine this week.
AWSOME
Problem with this design is that the back end of the shoe will drag making it harder to walk. Better design would be to have a tee leaving the back end dragging open pipe.
That depends on how the foot is attached to the shoe. If the snowshoe movement is held to a certain angle, like on manufactured shoes, then the back end won’t drag.
Looks amazing. I wish there were more details on how to wear them.
how about a photo of a boot fastened/bungees to snowshoe..
I wish there were pictures of the attachment to the boot or shoe.
I like the step by step pictures. These look really heavy though. Why not just heat the PVC and bend it to shape? Use steam or fill them with heated sand to heat them. All those connectors add weight and are a failure point.
because the pipe would become brittle and crack. you dont really need to go fast with snowshoes so they dont have to be extremely light.
When using the specified dimensions, these things are HUGE. They are almost twice the size of my Tubbs snowshoes and would have been very difficult to walk in. I recommend cutting the 18″ pieces to 14″, the 3″ piece at the toe to 2″, and the 8″ cross piece to 7″. Much more manageable at this size.
Where can you buy CPVC?, All I can find is PVC.
Go to the hardware store and ask for electrical conduit.
Its the same as PVC, however it is a cream color instead of a white. Most Lowes and Home Depots have them side by side.
Looks awesome! But I don’t know where you could get clear cement. But I know how to handle it. But it does’int snow much where I live, in Fort Mill South Carolina.
You get the cement where you buy the pipe. At a hardware or plumbing supply store.
cool but I wish I had the stuff to make it
Snow shoes are typically sized by weight. Any idea what the upper weight limit would be for these & what adjustments would need to be made to hold more weight?
I don’t know the weightage of the snowshoes, but if you wanted them to hold more you could probably use stronger rope. The weight doesn’t really affect the pipe because the pipe is there to push down the snow.
He was talking about how much surface area needed to keep up the weight, not how strong the shoe is. This rope is strong enough for any shoe.
How do you lace it?
Worked for me at Timberline Klondike Colorado.
I just got back from winter Survival campout in McCall, ID, and I really wish I had snowshoes. Definitely keep in mind for next year.
YES
This sounds so cool
Wish they gave more detaled instructions.
How do you wear them?
Attach to foot (boot or shoe) using bungee cords, rope, Velcro or other materials. For best results, attachment method will be similar to an ankle brace bandage
I like it
Looks hard yet fun!