How to Make a Ventriloquist’s Puppet
Build this goofy-looking puppet, then put on a show using ventriloquism (making it talk without moving your mouth).

WHAT YOU’LL NEED
- Wire cutters
- Wood rasp
- Screwdriver
- Wood screws
- Sandpaper
- Coping saw or jigsaw
- Drill
- Drill bits
- Small paintbrushes
- Utility knife
- Wood clamps
- Four small eyehooks
- L bracket
- Monofilament fishing line
- Wood glue
- 3/4“ x 10” dowel
- 2” wood ball
- Two toy wooden wheels (optional)
- (Head) Two clear pine boards 1/2” x 4“ x 2”
- (Box) Two boards 3/4” x 4” x 11”
- Two boards 3/4” x 4” x 61/2”
- Two small springs
- Wire coat hanger
- 1” square plastic washer, cut from a milk jug

WHAT YOU’LL DO
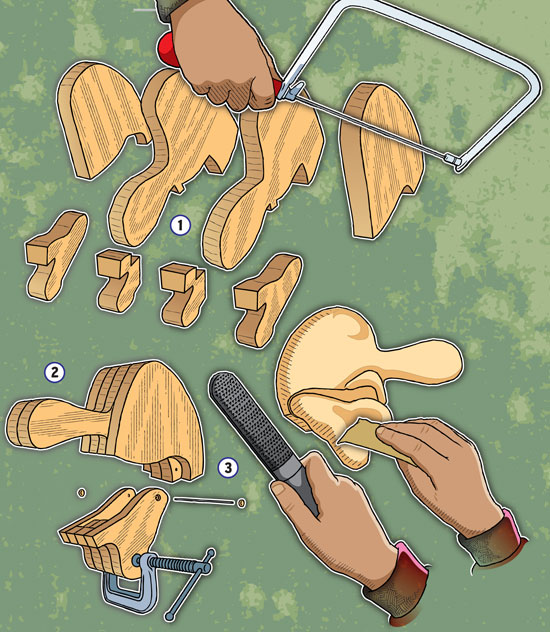
1. Cut out the head and jaw using the profile patterns (click here to download patterns).
2. Stack, clamp and glue the shapes together.
3. Rough out the shape of the head and jaw with a wood rasp and sandpaper. While shaping, make sure the head and jaw fit together and work smoothly. Drill a small hole through the jaw and head. Hinge together with coat hanger.
 When satisfied with how your puppet looks and how the mouth operates, remove the coat hanger; rasp and sand the surfaces of the head and jaw separately until smooth.
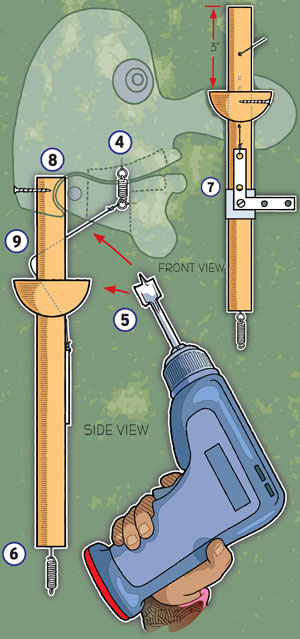
4. Mount the small eyehooks as shown in the head and jaw diagram. Attach a small spring to the eyehooks. Tie the fishing line to the jaw eyehook. Put the head and jaw together, and hinge in place with the hanger wire. Glue two wooden plugs to cap each end of the axle. Sand the ends of the plugs smooth.
The Control Rod
5. Cut the wood ball in half, then drill a 3/4” hole through its center. Sand. Slip the round end of the half ball 3” down the dowel. Drill a pilot hole, and glue and screw the half ball to the control rod.
6. Drill a pilot hole, and screw in the eyehook at the bottom of the control rod.
7. Attach the L bracket and plastic washer to the control rod.
8. Drill a hole at the base of the head. Glue the control rod into the hole. Screw in place. Drill 1/8“ holes through the rod (as shown) to string the trigger control. Sand holes smooth.
9. Thread fishing line through the holes and attach to the L bracket. L bracket should easily open and close mouth.

The Box Frame Torso
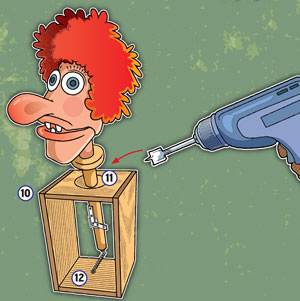
10. The box is open in the back so you can reach the control rod through a slit in the costume. Screw and glue the box together.
11. Drill a 1 1/2” hole in the center of the top of the box. Use rasp to angle the hole so the ball nestles and turns easily.
12. Mount the last eyehook in the bottom of the box. Insert the control rod through the hole and attach spring to eyehooks.
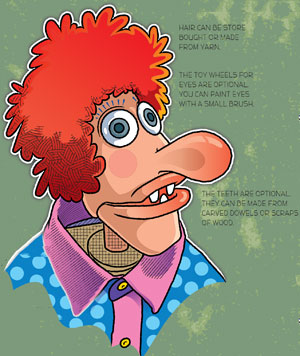
Decorate your puppet with paint, hair and a costume. Hands and legs can be left off or suggested with stuffed stockings.
Never heard of this before
Awesome! I’m gonna try this!
The head will be made out of clay. The rest i might need help with.
I don’t have any wood. So I’ll try it with clay. Have some different ideas for the face. Basing mine on a old TV show about reporters and their bad boss who i think was misunderstood. I’m making their boss in puppet form. At least that’s the plan. Will maybe get clothes out of Build A Bear. I have Asperger’s and my little brother has Autism. But that won’t stop me.
Hey thanks you I’ve been trying to figure out how to make my dummy mouth to work .
This is great! I can’t wait to try this!
This is great! I can’t wait to try it!!!!!!!!!!
Awesome can’t wait to try
maybe you can use your own size
i like it
Boo I want stuff I can do for free
this is a fun way and easy.where can i get the parts anyway?
Cool this is a fun summer project
Cool, Does if you build this do you get a workshop pin
for weblos?
eeewe! i dont want that kind! i want one like the dragon and boy!
do you have to get a pupet
I think I’ll try this, looks way easier than other stuff I’ve seen
No it is hard I tried it
This is the hardest project,(in my opinion)that I’ve seen on here.I have also done it.
Thanks! Ive always wanted to be a ventriloquist!
looks really hard but besides that awsome!
I don’t have wood yet.
awsome
awsome
Cool
Why doesnt it tell you what size wood screws