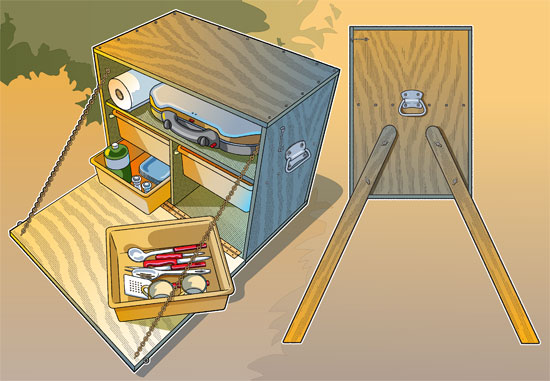
Build a Chuck Box for Camp Cooking
Make camp cooking easier and more convenient with this portable kitchen box.
WHAT YOU’LL NEED:
- Your cooking gear
- Tape measure
- 9/16″ plywood (You’ll need one standard sheet for the small-size box shown.)
- Four 1″ x 3″ oak planks for the legs (The average height for the swing-down work surface should be 30″ to 34″.)
- Scrap wood for drawer rails
- Eight carriage bolts and wing nuts
- Carpenter’s glue
- Sandpaper
- Drill and bits
- Screwdriver
- Fine-toothed saw
- Chain and six eye screws
- Paint
- Exterior wood screws
- Trunk handles
- Two eye screws and swing hooks
- Piano hinge
- Sturdy plastic wash tubs for drawers
WHAT YOU’LL DO

Step 1: Gather all the cooking and cleaning gear you want to store in your chuck box. The amount of gear you have will determine the size of your chuck box and how the inside is designed. The box shown here is just one example of how your box could look. Some boxes have only one or two drawers to make room for larger items such as pots and pans. It’s up to you.
Once you have decided on the size and shape of your box, cut out all the plywood pieces. Sand, prime and paint all plywood surfaces and edges before assembling. This is much easier than painting the box afterward. Add slide rails for drawers if needed.
Step 2: Screw and glue the box together. Remember to predrill all screw holes and countersink the heads for a neat finish. After your box is assembled, lightly sand it and brush on a second coat of paint.
Step 3: Lay the painted door in position and carefully screw on the piano hinge.
Step 4: Attach the chain.
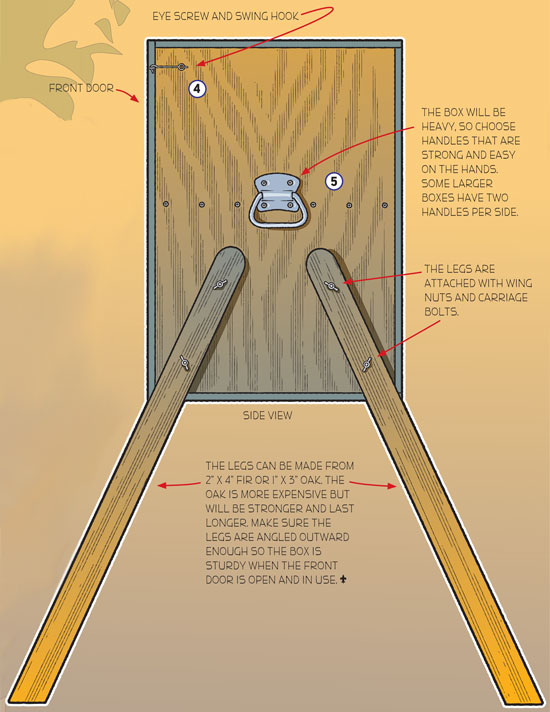
Step 5: Close the door and determine the position of the eye screws and swing hooks before screwing them in place.
Step 5: Attach the trunk handles. (Use nuts and bolts for this so the handles are extra strong. Some larger boxes many need two handles per side.)
Step 6: Fill your chuck box with your cooking gear and you’re ready for your next campout.
YOU CAN ADD SOME LEGS
Adding legs can get your chuck box off the ground and easily accessible. If you don’t have a tailgate or picnic table to set your chuck box on, this is definitely the way to go. The legs store flat and can be attached with no tools needed using wing nuts and carriage bolts.
The legs can be made from 2″ x 4″ fir or 1″ x 3″ oak. The oak is more expensive but will be stronger and last longer. Make sure the legs are angled outward enough so the box is sturdy when the front is open and in use.
PHOTOS OF COMPLETED PROJECT
Check out these photos of chuck boxes sent to us by Boys’ Life readers. If you have a photos of a BL Workshop project, please use the form below to send them to us.


So, does the menu determine the cookware or does the cookware determine the menu? and thus determining the size and weight of the chuck box. If too big/heavy not even the adults will want to use it. Just like packing for a hike, one must decide what is necessary.
that is cool and looks like that might be a little heavy I like the idea but how could I make it lighter?
it looks cool, heavy and convenient
We built 4 of them for our troop in Waterloo, Iowa. The problem is they were so heavy it took 2 strong adults to carry them.
Great idea though and all patrol stuff stays in same pace, easy to inventory and clean. TOO HEAVY for Scouts though!
These are most definitely heavy.
Would have been helpful if you had supplied actual measurements. I’m not too handy at guesswork.
There’s lots of old plans from previous boy’s life issues. I built mine off their old “patrol box” pattern.
We redesigned our chuck boxes several years ago based on what is really needed. The result was a lighter box to carry. Our goal was to have patrol equipment that 2 – 11 year old boys could easily carry. It has made getting to the camp site much easier. Also, we painted the inside white to help make everything easier to see.
Leave it at home. Backpacking is the way to go.
How much does the Chuck Box weigh?
It depends,
Depending on how much stuff and what stuff you put in there is what makes the difference. An empty chuck box can weigh anywhere from 10-25 lbs.
That’s great, and we don’t car camp during the year, but for a long-term camp (summer/winter resident) it’s nice to keep it all in one place.
nice easy box
The box as shown can not be built! You cannot screw or nail into the edge of plywood without the risk of splitting the plys. Instead, attach 1/2 inch by 1/2 solid wood such as pine or popular into each corner and screw (or nail) both pieces of plywood to that.
I followed these plans and it make a nice chuck box; just reinforce those corners.
Notice it says to pre-drill the screw holes. This keeps the wood from splitting.
Not entirely true. Pre-drilling the holes will prevent the plywood from splitting.
if you add another fold down shelf/piano hinge on the back side of your box, you can double your work surface. Just drill two holes in the back wall of your box and thread the chain through the hole and dead end them with a bolt and nut . Just pull the this work surface up first for storage!
amazing
Who’s the one that named this thing a “Chuck Box”? I only ask because my scout leader was named Chuck. Weird Huh? I always assumed that It was the “Chuck Box” because He built the supply container. The things that you find out.
From the “Chuckwagons” in the old wagon train or cattle drive days I assume, where the cook had all his cooking supplies and opened up in each new camp site for the night.
Make sure the stuff you want to put in your box will fit! (before you start cutting the wood) It is more important that a full roll of paper towels will fit inside than making sure it can be made out of exactly one sheet of plywood!
But be careful about making it too big too! Bigger is definitely not better if it won’t fit in any of your vehicles!
it is named a chuck box because it was a common thing for chuck wagons for cattle drives etc.
In cowboy lingo, “chuck” is grub (the food you eat).
Teach a woodworking merit badge where the boys make the box. Teach the class by patrol, and let them decorate as they see fit too.
Using 4 metal Conduit anchors set at angles on both sides with a wood strip as a stop, the leg poles can slip into place without the nuts and bolts (that magically disappear). By bolting 4 conduit anchors on the top, the legs become handles and the “Chuck” can be carried like a stretcher by up to 4 boys.
Hi there, Lizardman—Wondering if you have a picture of one of these boxes using the method you describe?
We did that way back when
My troop even put plastic granite sheeting on the fold out surface, and we made the legs so that we could make them stick out sideways out of the box so we could move it easier.
I just saw this and asked my Boy Scout if he knew what it was. He told me he did, and proceeded to tell me what it is used for. He leaves this Sunday for Summer camp, so his Troop won’t need them.
Great stuff
With a little planning you could offset the holes for the legs and drill two extra holes, then connect the legs so they stick out parallel to the bottom of the box. This would allow the box to be carried by two or more boys “sedan chair” style, which might be easier for smaller boys.
we put a pipe with groves it and srewed it in so that way it is more stable
I think it could be used for something else important
I LOVE BSA
I might not make one but to me it is the coolest thing I have ever seen for camping.
our legs just come out and slide into a different position for carrying
its great
For legs, we used folding banquet table legs that can be bought at a good hardware store. We also put pneumatic hand truck wheels on one side and a good handle on the other for easy moving without having to have 2 people to carry it. pneumatic wheels make it easy to get over obstacles like tree roots and rocks. Good basic plan though, I like it…many different uses for the box
put hinges on the legs so it can fold
Thanks alot we’ve been trying to make a good one for ages.
Our Chuck boxes had ‘pockets’ on the sides the wooden legs slid into. That way, we didn’t have to worry about losing the carriage bolts! Very cool article, brought back a lot of memories! Thanks!
AHH… so useful.
Designing a chuck box is a challenge. Make it sturdy enough to last, big enough to carry what is needed, and light enough for scouts to lift and set up without adult help. I’m looking forward to seeing if this one measures up.